Today I have a fun little project to share, but first I want to tell you about my new toy.... I got an Accuquilt Go! baby fabric cutter a few weeks ago (right before my vacation). I picked three dies, and I decided to go with ones that aren't necessarily very easy to do with a regular ruler and rotary cutter. I got a circle die that has three sizes of circles, an equilateral triangle die that also has three sizes, and the 3 1/2" tumbler die. The Go! baby is really easy to use, and my kids were pretty much fighting for turns at cranking the handle.
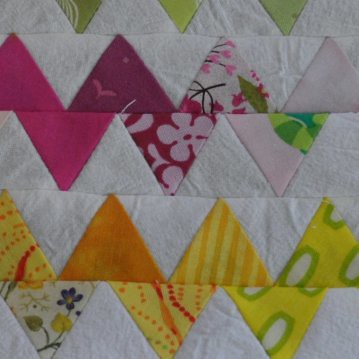
I opened my Go! baby as soon as it arrived and started cutting triangles. I've been wanting to make a zigzag quilt for a while and that was what I had in mind as I cut pink, green, yellow, and white triangles from my scrap bags. (I am pretty sure that the idea of making zigzags from these kind of triangles came from my friend Lorilee, and I think it turned out pretty well!) I used the medium triangles and they finish really small (about 1" on each side) but that's ok because this is a small project.
Step 1: Use the Go! baby to cut 14 medium triangles in each of 3 colors. Also, cut 45 white triangles. Sew the triangles into rows of 7 colored triangles alternating with white triangles, and make sure a white triangle is at each end of each row.
Step 2: Sew the rows together. I started by sewing the pairs of pink, green, and yellow rows together, making sure the triangles were offset to create the zigzag. Then I sewed the three sections together, this time making sure the white triangles were offset.
Step 3: Trim the sides of the mug rug top. Trim the longer edges too, if needed.
Step 4: Layer the top with batting and backing, and secure with a few pins. Choose thread for quilting.
Step 5: Quilt. I used my walking foot and matching thread to quilt down the middle of each zigzag row. Then I trimmed the excess batting and backing fabric.
Step 6: Bind. I found this
single binding tutorial and changed it up a bit by machine sewing the binding first to the back and then machine sewing it down in the front. I think next time I use this technique I will go with a 1.5" binding strip instead of 1.25".
All done! (It finished up at 6 1/2" x 8" in case you were wondering.) Now I have a place to keep my big sweaty glass of ice water all summer long. You could use the larger triangle on this die to maybe make a mug rug with one zigzag stripe, or you could make a placemat or larger quilt easily with that larger triangle. If you make a project with this tutorial, please let me know--I'd love to see it! (Somebody needs to make a Charlie Brown placemat or mug rug...)
I will be giving away an Accuquilt Go! Baby along with the winner's choice of three dies to one of my readers very soon, stay tuned!
