Tuesday, September 18, 2007

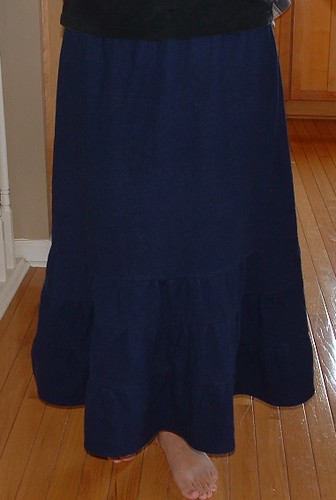
Finished skirt


I finished this up around noon today. I used 1/2" elastic in the waist and I think I need to tighten it up a bit. I really like the drape and feel of the linen fabric. I'm a little bit excited about finishing something in only two days as well. I think I will need to make a couple more like this... it could be really cute in baby cord for fall, don't you think?

Monday, September 17, 2007

I'm sewing every day this week


Here's the skirt I'm making for myself. I think it's going to be cute. I sewed this much today (it was already cut out) and I'm still going to pin and adjust the gathers on that last seam there. I'm still not sure whether I'll add a drawstring and elastic for the waistband or just use elastic. Oh, and I forgot pockets. Oh well.


I finished these dishcloths yesterday. The red one is messed up but I decided to show it anyway. I like the pattern of the yellow and green one and have started another one, this time with a green and blue variegated yarn.

I also went running tonight and went to the library with the kids today.

Saturday, September 15, 2007

Smart Habit Saturday

Oh, I really need this. My new habit for this week's Smart Habit Saturday is... kind words.

I need to work on this in many aspects of my life. I did pretty well today, except for a shameful outburst tonight.

My past habits are dealing with all the dirty laundry daily, and dishes done before bed each night. I'm doing pretty well on those.

I'm a left handed knitter.


I'm not a really prolific knitter, and all I really make is dishcloths and, occasionally, socks. A friend of mine was knitting up a dishcloth using this pattern and I had her email me the link for the pattern. She recommended that I use a knitted cast on, and since I only knew one cast on method, I googled it and in my search, kept finding statements something like this: Since knitting is an activity that uses both hands, we recommend that left-handers learn to knit right handed. I've also been told this exact thing by a yarn shop owner/teacher. Not exactly helpful. In knitting, one hand does most of the work, and for me, that really needs to be my left hand.

From what I read on Knitty, some left handed people are ok learning to knit righty, but for some it is just not possible. Here's how knitting works for me: I hold the working needle in my left hand, and knit stitches from the left to the right. Finished stitches are on the left needle.

This doesn't cause problems for me while reading patterns; if I ever knit a sweater with two different fronts I might end up with a left front after knitting the right front instructions. But then I would end up with a right front from the left front instructions. And, with cables, I have to twist them the opposite way in order to get correct results. But knitting left handed isn't really a problem, at least with the simple projects I make. I follow patterns as they are written and things generally come out looking the same as if a right handed person made them.

I did get really frustrated at not being able to find left handed instructions for the knitted cast-on. I'm sure I need to dig a little deeper and maybe it's out there. At any rate, it wasn't that difficult to read the directions I found and transpose them to using the left hand for the working needle. Here's how I did it: make a slip knot, place on right needle. Insert left needle into the yarn as if it's a knit stitch, pull up a loop. Place this loop on the right needle. Repeat until you have the desired number of stitches.

I'm going to keep looking for good left handed casting on and other knitting instructions and if I don't find them I just might make my own photo tutorials for the ones I know so far.

Monday, September 10, 2007

Free Motion Machine Quilting Tutorial

Machine quilting takes practice, but it's much faster than hand quilting and I love the look when it's finished. It's probably a good idea to make some 12 inch "quilt sandwich" squares of batting in between two layers of muslin and practice quilting those first. And also, know that it takes time and practice to develop this skill. Your quilting will improve with each quilt.

So... here we go!


There are several things you need to do to get your machine ready to machine quilt. You need a darning or free motion quilting foot. The special thing about this foot is that it goes up and down with the needle while you are sewing. This makes it so you can move the quilt any way you want while you are quilting it.

Lower the feed dogs on your machine. I have read that if your feed dogs don't go down, you can tape an index card over them. I haven't tried that though. You don't want the feed dogs telling your fabric which way to go; you are going to be moving it with your hands.

If your machine has adjustable presser foot pressure, you probably need to adjust it so there is space under the presser foot when the lever for the foot is in the down position. You have to have the presser foot in the down position in order to have top thread tension; if you don't have top thread tension, you can't sew. This picture shows the little black dial to adjust the presser foot pressure on my old Viking machine.

Your machine may not have adjustable presser foot pressure; one of my sewing machines does not. I can still machine quilt with that machine because it has a quilting foot that goes up and down with the needle while I sew.

I'm sure there are other types of machines and setups for machine quilting, but I only have experience quilting with two types of sewing machines. Whatever you need to do to get ready to machine quilt, you need to have your presser foot go up and down with the needle when you sew.

And finally, don't forget to change to a new needle. They actually make machine quilting needles, which I have used, but I haven't noticed a difference between those and regular universal needles.

Get some machine quilting gloves or other gripping device. I got my gloves at a local quilt shop, and I like them. They have plasticky gripper dots on the fingers and palms and make it much easier to move the fabric around while I'm quilting. There are also other options for helping you get some grip on your palms and fingers and you can find them if you do a search for quilting notions or quilting gloves.

If your sewing machine has a table extension thing, use it. If your machine fits into a cabinet and you have a flat surface, that's even better.

Next you need to get your quilt ready to fit on the machine. This is a baby quilt that's about 36"x42". It's not that difficult to quilt, but bigger quilts require more wrangling and patience. For a baby quilt, I quilt half of it, lengthwise, at a time. First, roll one side in to the halfway point; this side will be to the left of my needle.

Then, roll the other side in a little bit, leaving 5-6" or so unrolled in the middle.
(With larger quilts, you will probably do 3 or 4 or more sections of quilting, adjusting how the quilt is rolled up each time.)


Next, take the quilt and accordion-fold it from the bottom. The folded part will be placed in your lap and you will start quilting at the top.


First, position the quilt, lower the presser foot, and then using the hand wheel (is that what it's called?) take one stitch and pull the bobbin thread to the top.

Make sure the needle is right above where the bobbin thread comes up, and sew 3-4 stitches in one place. This anchors the threads and then, ta da! You are ready to quilt. You will need to pull the bobbin thread up like this each time you start stitching.

My son, who is 7, took this picture. It is supposed to show my hand position when I'm starting quilting. It's not the best angle to actually show that, sorry.

I quilted over to the right side of the quilt, unrolling it a bit as I went.

When I went back to the left, I had to roll up the right side of the quilt again.

I ran out of bobbin thread so I decided to take a picture and show you how it looks so far. You might want to make sure you have a full bobbin, or two or three, before you start. When you stop quilting (on purpose that is, not when you run out of bobbin in the middle) you need to sew 3-4 stitches very close together to keep your quilting line from coming undone. When my bobbin runs out, I just start sewing about 1/2" before the spot where my bobbin ran out, and sew right on top of those last few stitches.

Here's the back.

In this picture, I'm getting close to the bottom of the quilt. I find it helps control the motion of the quilt if I fold the top of the quilt under as I get closer to the bottom.

This is the quilt with the first half of the quilting finished.

This is the back of the quilt, showing a little closer up view of the unquilted and quilted areas. After you finish quilting the first side of the quilt, you will need to lay it out again, and roll up the already quilted side so you can quilt the other side. Try to make the second section of quilting blend in with the first section.

This shows the quilting all finished.

Here is a closer view of the quilting from the back. And, a little discussion about the meandering style of quilting that I used on this quilt. Meandering is a kind of curvy quilting that typically has smooth curves, no sharp (or blunt, I guess) corners, and lines that don't cross over each other. If you look closely at this quilt you might see some loops in my quilting; I got stuck and had no other choice. Plus, there are no quilting police. Also in meandering, you should try to keep the distances between quilting lines relatively even.

When you are practicing, I'd suggest trying meandering, in different sizes (when it's smaller it's called stippling). You could also try writing your name, drawing pictures, making loops, or whatever you want. You just want to get used to the feel of moving the quilt with your hands while you're pushing the pedal with your foot. Which brings me to stitch length: there are long arm machines and Berninas with stitch regulators that help keep your quilting stitches a uniform length. If you're just quilting on a regular machine, you'll need to be your own regulator. You don't want to have stitches that are overly long or too short. You'll need to experiment to see what stitch length works for you. You might want to try going faster (via the foot pedal) than you think is necessary and then figure out the right speed to move the fabric with your hands.

Let me know if you have any questions or if you have some quilting you want to show off!


EDITED to add:
When I machine quilt, I start in the middle section and usually go left to right in a section about 8-10 inches wide, and then go back and forth while I'm moving down the quilt. Then when I get to the bottom, I clip threads, re-roll the quilt, and start again on one of the sides (or slightly over from the middle, if it's bigger than a baby quilt).

Saturday, September 08, 2007

Smart Habit Saturday

Wow, I made it through my first week with a Smart Habit Saturday goal. My goal was to take the dirty laundry down to the laundry room every day. I did pretty well with the exception of leaving it (all gathered up though) in a basket in the kitchen-level hall on Friday. I found that it wasn't all that difficult of a task, and I'm going to keep it up and add, for my new goal... ugh. Making sure all the dishes are done each night before going to bed. I have a bit of a hard time with being told what to do, and if you've ever checked out Flylady, you know that cleaning your darn sink is her first assignment. I've done Flylady reasonably well... a couple times, over the years, but not the "clean sink" part. I'm finally ready to go there. We'll see how it goes.

Wednesday, September 05, 2007

Quilt Basting Tutorial, with bonus batting piecing instructions

Here are instructions for how to baste a quilt in preparation for machine quilting. You could baste it like this for hand quilting or tying as well.

Here's what you need:
quilt top
batting
backing fabric
wide tape
curved safety pins
Kwik Klip pin closing tool

I didn't have a piece of batting the right size for this quilt so you also get to see how to piece together batting.


Step 1: Spread and smooth out your backing fabric on a carpeted floor. The backing should be about 4-5 inches wider and longer than the quilt top. I used flannel for this quilt backing, but sometimes I use regular woven fabrics too. If there is a right side of the backing fabric, it needs to face the floor. You can iron it too, but it's not necessary unless your fabric is super wrinkly. Use wide tape to tape it down. You don't want the backing fabric to be stretched tight, just flat and smooth. I usually use packing tape but haven't been able to find it, so I used duct tape this time.


Step 2: Spread your batting out on top of your backing fabric. I had to use 2 small pieces; I overlapped them by about 4 inches.


Step 3: Cut on an imaginary wavy line through both thicknesses of batting.


Step 4: Remove the small cut pieces of batting and match up the curved edges of the batting pieces. They should butt up to each other but not overlap.


Step 5: Next you'll hand sew the batting pieces together. Here you can see how I did it because I used black thread. You should use thread that matches the batting though. It's ok to use pretty big stitches. The quilting will hold this together fine in the end.


This photo shows the batting seamed together. I removed the black stitches and sewed the entire seam with light colored thread.


Step 6: Spread the quilt top on top of the batting. Iron it first if it's really wrinkled. Smooth it out nice and flat.


Step 7: Using curved safety pins (these should be available at your local quilt shop), start in the middle of the quilt and pin all 3 layers together. I put pins about every 4-5 inches. Make sure you don't pin the quilt to the carpet. I use the Kwik Klip pin basting tool for closing my pins. You can use your fingers but they can get pretty sore after closing lots and lots of pins.


Step 8: Cut off the excess batting and backing, making sure to leave a couple inches beyond the edge of the quilt top. Then, remove the tape (give it to your kids so they can make a tape ball) and you're ready to quilt. Unless you pinned your quilt to the carpet. In that case, just fix the places where you did that and then you'll be done.

I hope this is helpful! As always, let me know if there are any questions or clarifications needed.

Saturday, September 01, 2007

Smart Habit Saturday

I have been thinking about doing this all week since I found out about the Lazy Organizer blog. I'm a bit intimidated. I started out early in August decluttering because I wanted to, a little bit each day, and I did it for 5-6 days in a row and then I got a cold. I didn't think it would be too bad, but it got bad. Then I got better for almost a week and got another cold. So my decluttering fell by the wayside but I've been reading some of the archives over at that blog and I really like the idea of setting goals in such a public way. And I have a couple of good habits, at least, and I know that once something is a habit it isn't hard to do. (I've made my bed nearly every day for about 12 years. It started because of mice.)

Sooo... I guess... I'm going to say my habit is moving all the dirty laundry down to the basement every day. I have another one too but I'll save it for next week. I fuss about all the stairs in my house but if I make it a habit, it's not really that big of a deal to go down as many as 28 stairs and get the dirty clothes where they need to be. Wish me luck!

Open Source Sewing

Ooh oh oh! I just listened to the latest episode of CraftyPod and I'm getting a little excited about it! It's all about the siteBurdaStyle which is a site where you can download patterns and make clothing for yourself, or to sell. I'm probably going to make the Emily shirt... recycled, I think. I'll have to get over to Goodwill sometime next week and find a couple men's shirts. I had seen the recycled tutorial for this Emily shirt before, I think it was linked from Craftzine.com. But I didn't really know about BurdaStyle before this. I just registered and will be poking around here a bit in the next few days. Go check it out!

Beginning Sewing

Based on some of the search terms and comments here, I'm thinking about doing a series of beginning sewing tutorials. I will probably start with a basic simple quilt top tutorial and a "how to make a t-shirt" tutorial. Both of those things are very easy and make great beginner projects.

Thursday, August 30, 2007

my next project

I'm feeling mostly better from 2 colds in a row and I'm going to finish up that scrappy log cabin quilt. I'm going to make a free-motion machine quilting tutorial while I work on it.

Monday, August 27, 2007

look what I just made!

I decided to make some scrappy quilts and use up some of my quilting fabric stash. I have a lot of fabrics in there that I don't really love any more, so I'm going to make some charity quilts. I don't know exactly what organization they will go to yet, or even how long it will be until I finish them, but it felt good to get this part done:


I cut 6.5" squares when I could, and the fabric that was not big enough for squares, I cut into rectangles that were 6.5" on 2 sides so I could still use them in the rows between the squares. Something happened with my planned/random look while I was sewing the rows together and I don't think it looks quite right between rows 3 and 4 but, oh well, it'll do.

Sometimes it's really satisfying to make up a quick project that hasn't been planned out for weeks or months.

Friday, August 24, 2007

what to do next...

I could show a couple pictures here, I've finished up a skirt and dress for the older sisters to the new baby next door. But I need to figure out what I'm going to work on next as well. I'm going to be quilting my friend's baby quilt and also the scrappy log cabin one I started a while back. Maybe I need to get busy with basting them so they'll be ready.

I'm also making up some trick-or-treat tote bags for my etsy shop. I've finished one and have fabric to make a few more.

Some other things on my list of future projects:

navy linen skirt for me
knit wrap Ottobre top for me
applique dinosaur tees for my boys
baby quilt for my new nephew
sling for my SIL
hemming (ugh) those cute Old Navy pants I got a while back. I'm going to prewash them a couple times first so they get as shrunken as possible before I hem them. I've hemmed pants before and then had them shrink too short after laundering and I hate that.

Saturday, August 18, 2007

Serger Rolled Hem Tips

More than once, I have been ready to do a rolled hem on my serger and then I couldn't find the book. It took me a while, and some time spent reading library books about sergers so I could better understand what's going on with that machine, but I figured out how to adjust from regular seams to the rolled hem settings. Here's a picture of my serger (a trusty Brother 1034D), ready to sew a pretty rolled hem:
And here are the steps, with handy explanations:
1. Remove the left needle. (I left the cone on but the needle is out, for now.)
2. Remove the stitch finger. On my machine there is a lever to press in order to remove the stitch finger.
3. Adjust the dials on the side for rolled hem stitch width (really narrow) and length (really short). The dials have "R" markings for the rolled hem setting.
4. Adjust your thread tensions. This is the thing that I had a big a ha moment about. The rolled hem is going to be rolled down to the underside of your fabric.

You want the upper looper thread to be looser, so it can be pulled down slightly to the underside of this hem stitch. Smaller numbers=looser tension (this one took a while to sink in for me). So if I'm normally on about a 6 for the upper looper tension, I change it to a 4 or 5.
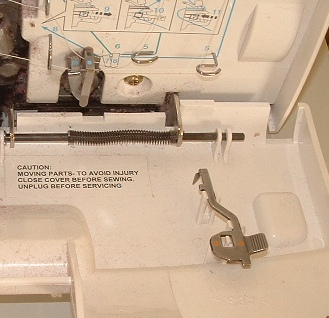
Now you want your lower looper thread to be tighter, so it will pull the upper looper thread down to the underside of the hem stitch. Adjust the dial to a higher number. I adjusted it up to between 7 and 8 from the normal 6.

Finally, your right needle tension needs to be loosened. And I didn't change mine very much. The handbook says to put it at 4 but I've had success with it a bit tighter.

Now you can try this out on a swatch before you actually start on the garment you're hemming. If it doesn't look right, adjust one thread tension at a time and see if you can get it. Hope this helps!

Oh yeah--I also took a photo of the correct stitch finger storage position since I can't ever remember the way it goes in:

Thursday, August 16, 2007

Where I've been.


create your own visited states map
or check out these Google Hacks.

And, I haven't been out of the US, ever.

What brings me joy?

Jessica over at kerflop is having a contest. Here's my entry:

What brings me joy?

Blessed time alone. Especially time in the morning, although I'm still working on executing this one more reliably. Even better, and even more rare, time alone in the morning after exercising.

Connected, peaceful time with my children and husband.

Chatting on the phone for a couple hours, or 10 minutes, with my best friend.

Making progress in my life. I'm running, I'm blogging about something useful and interesting (well I think so at least), my husband and I are making progress on our money communication and our debt reduction plan. I'm doing the grocery shopping and having fun being frugal (see thegrocerygame.com for more info). Before I got this nasty cold I was making progress on daily decluttering and better home maintenance. (I'll be back on that one right away, I promise.)

Finishing projects brings me joy.

Wisely managing my time and commitments brings me joy. Another thing that I'm working on.

A good day at church, where nobody says anything off-the-wall or crazy, where a good, peaceful, spiritual feeling exists through all meetings, that brings me joy.

And since it's that time of year in my and my husband's extended families, new babies in the family bring me joy.

Monday, August 13, 2007

little serger trick

I sew both knits and wovens on my serger, and I change needles when I switch from one to the other (universals for wovens, ballpoint for knits). I don't discard my needles all that often; I do when it's obviously needed but sometimes I'll have only sewn a couple t-shirts and then be ready to switch over to wovens. I used to just keep the needles in one of those cases they come in, but I came up with something recently that I think is pretty clever. My serger tools (screwdriver for needles, big tweezers for threading, thingies to hold the thread in place when I'm not using cones) are in a little ziplock on my sewing table, and in that bag I keep a square of folded over knit fabric, and a square of folded over woven fabric. When I take my knit needles out of the machine, I put them in the square of knit fabric and then put that back in the bag. And when I'm set up to sew knits, I store the woven needles in the little woven scrap.

As an added bonus, when I take a break from sewing and can't remember what kind of needles are in the serger, now that I have this little trick I can just look at which scrap has needles in it and then I'll know which needles are in the serger.

ugh

I have a bit of a cold and haven't sewn for a few days. I did finish up two more cloth grocery bags on Friday, and yesterday I helped my son and his neighbor friend, who just got back from a summer away, sew up some pillows. The friend made a 4-patch front panel and my boy just made his out of baseball fabric.

I'm not even sure exactly what I want to make next. I should work on baby quilts. My nephew was born a week ago and I am still not even sure what I'm going to do for his quilt. I have some ideas though, I think it will be a lot different from what I normally make. And I have the scrappy log cabin quilt to continue working on as well. I guess I'll be making a trip to the fabric store this week. Maybe the quilt shop too.

I also have a dress cut out for the neighbor girl who's turning 2, and thinking about making a skirt for her 3-year-old sister. I might size down the pattern I want for her since it starts at 104 and she's probably a 98 or 92.

Friday, August 10, 2007

shirts for Webkinz

I have been making shirts for Webkinz. It's fun and funny. It makes me laugh that I've made 6 tiny shirts for stuffed dogs and pandas. My son made a crown for one of his friend's webkinz dog today. I sewed the rubies on it but he did the rest.

Sewing for your family: getting started

As early as 5th grade, I was sewing a fair amount of my own clothes. My mom helped me, and she and I made clothing for my siblings too. I continued sewing during high school and a very little bit during college. I started quilting the year I got married, and made quilts and diapers for my older son. And a few clothing items but I tell you, the big 3 patterns I used were pretty much awful, as a rule. I made this woven, collared shirt for him, using an old light blue check shirt of my husband's. A cute recycled project, you'd think. No. The collar on that pattern was gigantic, out of proportion, and the shirt never looked right. Other projects I made for him using big 3 patterns were much too big even though I made them in the same size he wore in store bought clothing. Trying to sew clothing for him was pretty disappointing.

When my second child was born I came across a sewing forum on a parenting website and discovered that there are some great online sewing resources available these days. I found better patterns, great fabric sources, and sewing communities chock full of information and support. And now, I sew a lot more, I enjoy it more, and I make cute, stylish clothes for my kids that actually fit. And, it's a bit more challenging, but I'm also having more and more success making clothing for myself.

So, here are some of my favorite sewing and fabric related websites:
Sewing Mamas is pretty much my online sewing home. Sewing Mamas has several active sewing forums, and loads of contests, swaps, and free patterns and tutorials. It's a great site with a good mix of beginner and experienced sewing moms.

PatternReview.com is an amazing site with probably thousands of user reviews of sewing machines, sergers, and just about any pattern you can find. I do still sew from big 3 patterns occasionally, but when I do, instead of going straight to the fabric store and flipping through the big book to find something, I look online at mccall.com for the McCall's, Butterick, and Vogue catalogues or simplicity.com for Simplicity and New Look patterns. I write down the pattern numbers I like and then can go on over to patternreview.com to check for reviews. Patterreview.com also has reviews of patterns from tons of independent pattern companies.

I've also used the machine reviews at patternreview.com to help pick out a couple of my machines and will probably go there again when I'm ready to upgrade to a better machine (soon, I hope!).

Ottobre Design is my favorite pattern source these days. They have the best patterns for sewing for boys, and of course, lots of great girl patterns too. There are 4 children's issues and 2 women's issues published each year. The patterns are printed on removable sheets in the middle of the magazine and you have to trace them in the desired size and add seam allowances. It's a little more work (and money) than a pattern you can get a JoAnn's for $1.50 on sale but it's worth it. You can subscribe directly through the Ottobre site or through the Wooly Thread. Individual back issues can also be purchased through the Wooly Thread or SewZanne's Fabrics.

Which brings me to fabric websites. SewZanne's has a great selection of fabrics (especially knits), patterns, and notions. They also have very fast shipping times and good customer service.

Fabric.com is a great fabric source that has frequent sales and usually has reasonable prices. Fabric.com has a wide variety of fabrics including home dec, quilting fabric, and apparel fabric.

I have also purchased fabric occasionally from Trim Fabric and FabricLine, and Wazoodle and been happy with the results. There are also many, many other online fabric shops.

Finally, I wanted to add that you should still be on the mailing lists for your local JoAnn's and/or Hancocks, watch the sales, and use the coupons that come in your mailers. I try not to shop in either store without a coupon, and I buy most of my thread, sewing machine needles, and notions at these stores.

So, there you have it! Check out these sites and have fun sewing!

Thursday, August 09, 2007

Baby Clothes


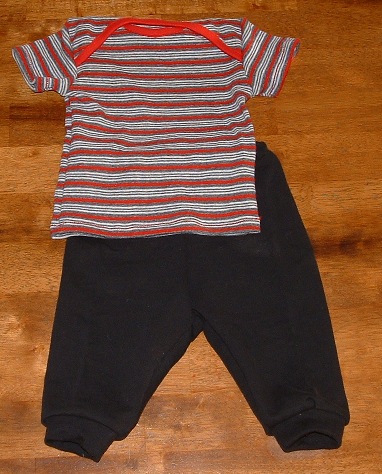
I just finished these up. The t-shirt pattern is from Ottobre Design issue 5/2006 only I made it short sleeved and just a shirt, not a onesie. Pants are from New Conceptions Baby Essentials. My favorite baby pants pattern, so simple.

Two of these sets are going to my nephew in Arizona. He's 3 days old now. The stripe shirt/red pants set is for one of my church friends.

I also found... 2 UFO baby outfit sets that I will finish up for another church friend who's having a winter baby. And some finished baby pants. I had a shirt started to go with those but don't know where it is.

Wednesday, August 08, 2007

New church bag.


bag front
Originally uploaded by vickivictoria


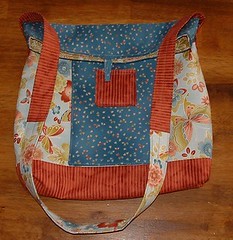
My first flickr blog post. Wow. I just finished up this bag, well almost. It's going to be my church tote bag, and it's a huge improvement over what I've been using. I'm hoping the handle will hold up ok. I used 2 layers of maybe a medium craft weight interfacing.

I know I've mentioned this bag here before but I'll just say again that I used Renee Plains' Foldover Bag pattern. I like it! I made the pocket patches frayed instead of, well, not, and I think it's cute that way.

I don't know how to have flickr show more than one photo so if you want to see the back of the bag, click the picture to go to my flickr page.

Next up: baby clothes. My sister-in-law had her baby on Monday. I have a church friend having a baby this month too. I've got some things partially cut out; I need to finish that up and rethread my machines and get busy!


Sunday, August 05, 2007

Podcasts

I just got my first mp3 player (it's a Creative Zen Nano Plus and I got it dirt cheap from buy.com) at the end of last year and while I ripped a bunch of music CDs to listen to on it, I started listening to podcasts and that's what I mostly use it for now. I listen to podcasts while doing dishes, folding clothes, doing other cleaning jobs, or sewing. I like podcasts. And I wanted to share some of my favorites with you here.

Oh yeah, if you don't know what a podcast is, it is just like a talk-radio show, only it is on the computer available to be downloaded and listened to on your portable player whenever you want. Or you can usually listen online, as long as your computer has speakers. There are podcasts out there on all kinds of topics, and they are almost always free (I haven't encountered any that you have to pay for at least).

Podcasts I listen to:

Material Mama
Material Mama is a fashion and craft sewing podcast and it was my first podcast. Episodes are usually around 30 minutes and are informative on many topics related to sewing clothing.

Creative Mom Podcast
This show is usually an hour and there is a new episode each week. Amy talks a lot about sketching, drawing, painting, with occasional sewing and knitting content. Each episode showcases great music and, usually, books for kids or grownups. Other neat things about the CMP: thematic prompts, recipes, a monthly ATC exchange, a flickr group where CMP listeners can share photos of their creative work. I really enjoyed the CMP issue that featured journals (episode 7, I think?).

CraftyPod
CraftyPod comes out twice a month and is usually about 20 minutes long. Sometimes there are interviews with craft people, sometimes a show will be about a specific technique or craft. The CraftyPod site also has regular blog updates.

CraftSanity is a craft interview show that usually goes well over an hour. The host, Jennifer Ackerman-Heywood, does an aftershow after the main interview that is usually about her life. She is an excellent interviewer and I think her shows are very interesting.

Cast On is a great knitting podcast. And I don't even knit that much. You've gotta listen to this one.

Quilting Stash
Quilting Stash's Annie Smith has interviews and interesting discussion of the quilting world. Recently Annie had a 2-part interview with Susan Branch; there's a great story of how Susan met the Beatles when she was a teenager included in that interview.

Alex Anderson's Quilt Connection
Alex Anderson's podcast is usually around 20 minutes and has interesting information about her quilting life now, including her work on her internet Quilt Show, as well as interviews and discussion on various quilting topics.

I'm planning on finding out about more sewing podcasts but for the most part I usually listen to new episodes of all of these podcasts.

Saturday, August 04, 2007

Attached Elastic Waistband Tutorial

This tutorial explains how to do an attached waistband with enclosed elastic. I use this technique on shorts and jeans for my boys.


Step 1. Sew the waistband piece into a circle, press seam open. Sew the elastic into a circle. I overlap the elastic 1/4" and zigzag, making sure to backstitch. You will have to determine how much elastic to use based on how much recovery it has and the kind of fabric you're using. I use pretty firm elastic so I just cut the elastic the length of my child's waist measurement. If your elastic has less recovery you will need to use less.


Step 2. Turn the pants right side out and pin the waistband piece inside the pants, with the waistband piece's right side facing the pants wrong side. For some reason my waistband pieces don't always fit quite right, I had to unpin it and sew it a bit smaller before it was the right size on this pair of pants.


Step 3. Sew the waistband to the pants. I tried to keep this seam at about 1/4"-3/8".


Step 4. Fold the waistband piece up and press. Press the seam allowances towards the waistband.


Step 5. I don't know if my picture shows this well enough but I'll try to explain. For this step you will be topstitching the waistband down on the right side of the pants, so change to topstitching thread. (I use a different machine to topstitch, my more heavy duty, older machine.)

Turn the pants wrong side out. Place the elastic on the waistband and fold the waistband down over the elastic. Fold the edge of the waistband under about 1/4" (you can press this first, it might be helpful, but I usually don't.) Make sure the folded waistband edge is past the edge of the elastic and start sewing. You will need to make the folds and adjust the position of the pants as you sew. Take your time.


Step 6. Just keep going. As you sew you will need to pull the fabric from the back around to the front, since you will be sewing the circle. Another thing that will help is to adjust the fabric and elastic so the waistband is starting to get gathered.


Step 7. When you get to the last 1/3 or 1/4 of this seam, you will need to use both hands to stretch the elastic (within the waistband casing) while you sew. You can adjust the waistband and then stretch and sew a bit, and then adjust again and sew again.


Finished! You can shrink the elastic down a with some steam from your iron. It will also likely shrink down a bit after being washed and dried. I don't sew through the elastic or do anything else to make sure it won't twist in the waistband, but I haven't had any problems with it twisting in denim fabric.

Please let me know if you have questions or if something isn't clear.

Friday, August 03, 2007

posting when frustrated

I should have waited to write about those jeans. They are always a big project for me, and I don't have the perfect machine(s) for doing topstitching and hemming well. I'm usually frustrated right after and I sure was when I finished up this pair of jeans. But now I'm happy that they're done, I really like how the photos look, and I know they they will look even better after getting a bit distressed in the wash. And finally, my child will grow and they will look really cool on him eventually. I'm going to make some easier projects for the next little while.

Thursday, August 02, 2007

Finished!


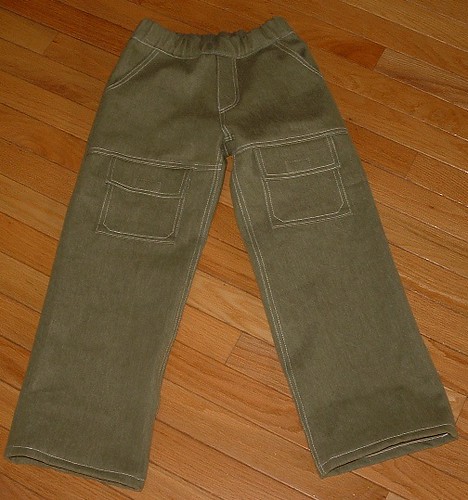
Big sigh of relief. What a project. These are from Ottobre Design 1/2007, made in size 116 with 128 length. (Way too long.) I realized once again my dislike of pocket flaps. I had D try these on and they are absolutely huge on him. And I already know this fabric won't shrink much. Oh well, at least he will grow. I will wash and dry them a couple times right away to break them in a bit.


I had a bit of an issue on the back pocket velcro. The back pockets themselves, too. The directions for the pleat detail weren't very clear but I figured it out. Also, I hemmed the pocket tops first, then realized I should sew those pleats and then hem after that.

I didn't figure out how the (back) pocket and flap velcro were going to match up before sewing. And I ended up having to unpick the pocket velcro... it was already after the pockets were sewn on the pants and I didn't want to undo that topstitching so I handsewed the pocket velcro on after the flaps were in place.

Wednesday, August 01, 2007

working on jeans

I am making some Ottobre jeans for my big boy and they are tedious. I do not much like making pocket flaps. I just broke a serger needle going over a thick seam. I am looking forward to making something easier next. I need to find a pattern for jeans that have front pockets, back pockets with no flaps, and that's all.

Monday, July 30, 2007

Scrap Catcher


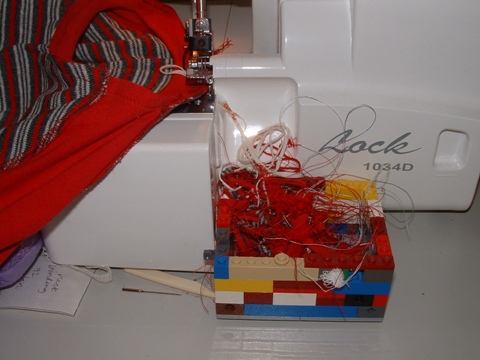
My son made this Lego scrap catcher for me. It holds the scraps and threads from my serger. I think it's really clever and cool.