Friday, February 26, 2010

Chicken Quilt Block Tutorial

Update August 2019
All images and designs are copyright protected. I am working on my own pattern which will include multiple sizes and it will be available soon. Thank you for respecting my intellectual property and copyright.

Also I would love to see your chicken blocks on instagram, feel free to tag me @vickidjl and use the hashtag #chickenquilt.

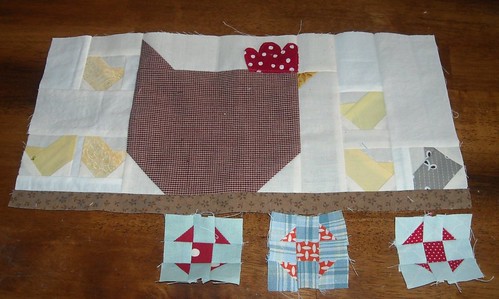
Here are instructions for making a chicken quilt block. This block is 7x8 inches as shown and will end up 6.5x7.5 inches when sewn into a quilt. All seam allowances are 1/4".
 
Step 1: Cutting. 
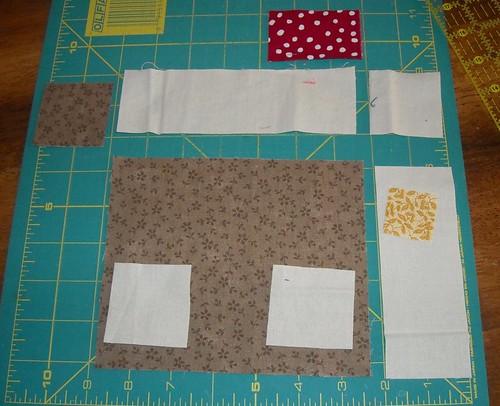
From your chicken body fabric, cut a rectangle 5.5x6.5 inches, and a 2x2 inch square. 
From your background fabric, cut 3 squares, 2x2 inches, a strip 6.5x2 inches, and a strip 5.5x2 inches. 
From your beak fabric, cut a 1.25" square. 
From your comb fabric, cut 2 rectangles about 2x2.5 inches.
 
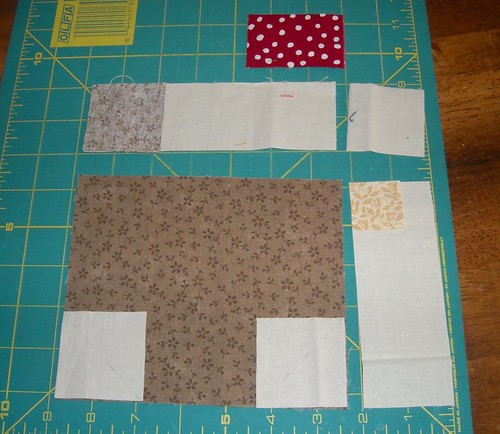
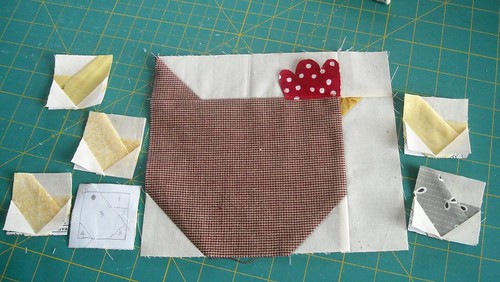
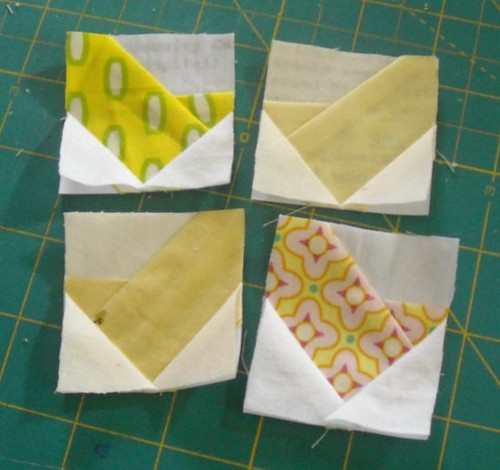
Step 2: Draw diagonal lines on all your squares except for one of the background fabric squares. Mine are kind of light, I will make up for that by stitching them in a bright color so you can see them better! (It was a good excuse to not change my thread.)
 
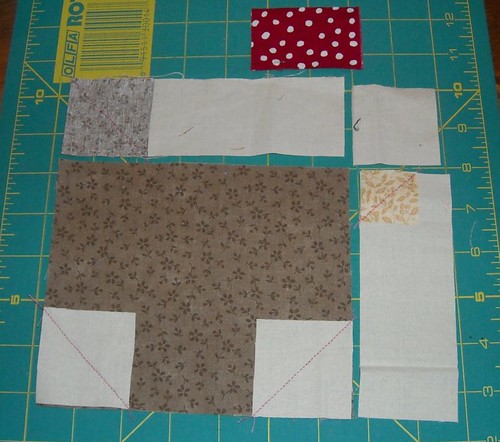
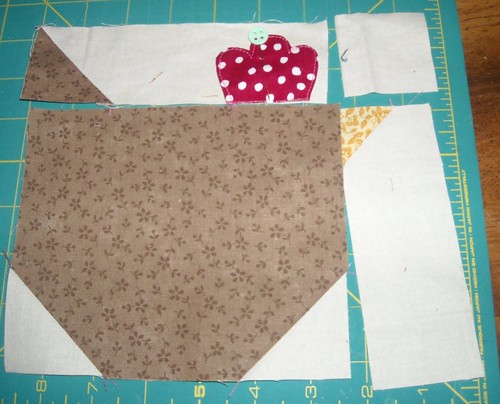
Step 3: Stitch on all the diagonal lines as shown in the above photo. The stitching on the tail square doesn't show up really well--it goes from the upper left corner to the bottom right corner. 


Step 4: Trim the excess fabric along the seams you just sewed, leaving about 1/4" seam allowance.

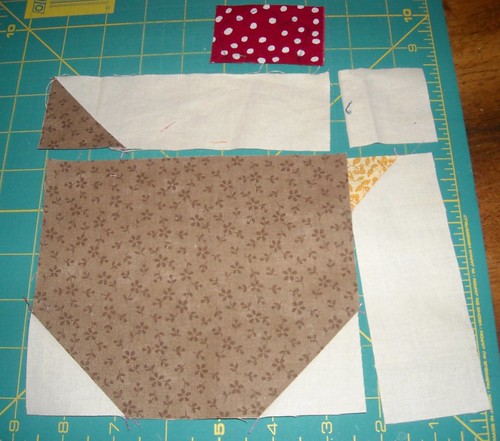
Step 5: Press your seam allowances toward the darker fabric. Also, draw a comb shape on one of the comb fabric pieces (this didn't show up very well in my photo, sorry). You can use a water soluble marker or whatever else you have on hand. I used a regular pen and will put the side with ink facing backwards when I stitched it into the block. Place the 2 comb fabric rectangles wrong sides together. 
Step 6: Sew close to your comb shape drawing, and cut out the comb shape close to your stitching. Pin the comb so that the bottom edge lines up with the bottom edge of the upper left rectangle and the right side is about 1/4" in from the right edge of that rectangle. You can baste it in place if you want, or not. 
 
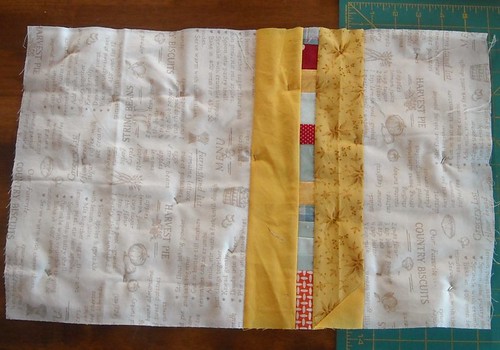
Step 7: Sew the two left pieces and the two right pieces together. Press the seam on the left side down and the seam on the right side up.


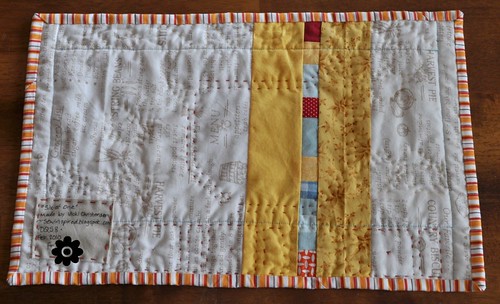
Step 8: Sew the right side and left side together, nesting the seam allowances so they match up well. Press that seam and you're done! 

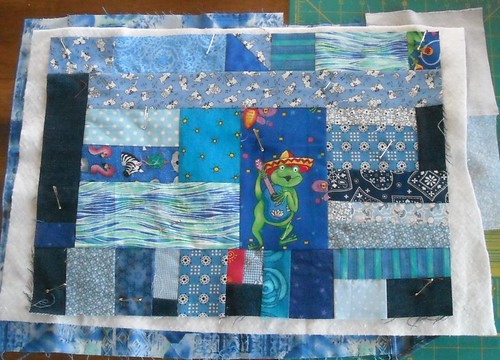
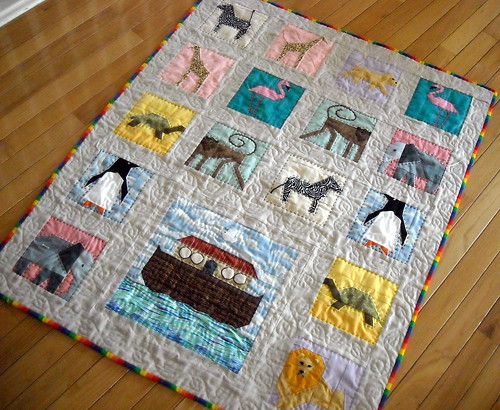
If you make a chicken quilt block using this tutorial, I'd love to see it! Can you think of any variations? Maybe a patchwork chicken, maybe a wing, maybe a change in size... I might have to make a couple more of these.

Also--please feel free to use this tutorial to make personal projects as well as things you make for sale.

Thursday, February 25, 2010

doll quilt finish--"Six of One"

So... I hardly ever name my quilts, maybe this is the start of something new for me. Here's my finished quilt for DQS8, "Six of One":
 
And here are some thoughts about this quilt:
*hen pattern is something I came up with based on one of the chickens in this quilt--I'm going to get a tutorial up here on the blog ASAP so you can make your own chicken
*wonky shoo-fly blocks--idea is from Collaborative Quilting and also from this quilt by Sarah/krommama
*hand quilting is done with 2 strands of DMC floss in red, yellow, and gray
*bound in soft Heather Ross stripes
*the blue plaid is from scraps leftover from the little baby blessing romper I made for my son who's now 5 1/2, don't worry I didn't use it all
*I LOVE it!

p.s. does anyone "get" the name of the quilt, or am I a huge dork and need to explain it?

Wednesday, February 24, 2010

one of my favorite parts of making a quilt

I love it when a quilt is pin basted and ready to quilt. It gets a tiny bit of the quilted feeling, and it's the first time all 3 layers are together as one. I get really excited about getting it done!
Here's the back of my DQS8 quilt. Pin basted, ready to quilt. I'm not going to show the front until it's all done.

My 9-year-old's blue scrappy placemat. He did the sewing and helped with layout choices. I did most of the pairing up of fabrics for him to sew. He's going to machine quilt it himself.

What parts of quilting do you like best?

Monday, February 22, 2010

thank you for voting for me!

The Handmade Olympics are over, and I wanted to thank everyone who went over and voted for my Noah's Ark Quilt. I really appreciate your support! I didn't win, but I got 148 votes. Thank you so much for voting!

Speaking of voting... you might remember back in December I entered my Wreath of Doves quilt in the Holiday Traditions quilt contest at quiltinggallery.com. Well, turns out, I did win a prize in that contest! A few weeks ago I received the book Creative Ways With Books & Journals by Sue Bleiweiss and Terri Stegmiller. It's a fun book-making book filled with fabric, paper and mixed media ideas for bookmaking. Here's my favorite project in the book:
Bookmaking is one of the things I've been interested in for a long time, and it's on my list of things to do in 2010. Maybe I'll start with this little stab stitched book!

Saturday, February 20, 2010

Doll quilt swap progress

So here's where mama hen and her chickies are at now. I am thinking I will probably make two more, maybe 3, of the shoo-fly blocks to fill out the bottom border row. My ailing deadline for this is March 1 so I am going to work on this now until it is done--meaning no getting sidetracked with other projects!

Wednesday, February 17, 2010

tree applique block

This block is for Melissa in my Block Swap 2 group. Based on this tutorial over at Cluck, Cluck, Sew.
 
I couldn't make it with the simple, oval leaf shapes--I made mine a tulip tree. One of my favorite trees when I was studying botany in college. One of my friends has one in her yard at her new house--lucky! I think they have a very cool leaf shape and pretty flowers too. If you were wondering, the scientific name is Liriodendron tulipifera. 
Have a great Wednesday!

Tuesday, February 16, 2010

Valentine's girl. And dress.

Last week my friend and I made Valentine's dresses for our girls. Here's my girlie.
 
Today I spent some time working on one of my bee blocks; hopefully I'll finish it tomorrow so I can blog about it. (It is my first botany quilt block!)

Friday, February 12, 2010

string block for Rachel

Here's what I made today:
It's my block for Rachel of p.s. i quilt. She is the February person in our bee beautiful group. She sent the fabric strings and said we could use whatever fabric we wanted for the center strips--I decided to use all greens. I think I have enough leftover to make another block and am planning on using purple for the centers of that one. Her tutorial for this block is here. It's the first time I've used small stitches along with paper piecing; I should have done it that way sooner! I set my stitches at 1.5 and the paper ripped off really easily.

I am planning on making a little chicken block tutorial in the next few days so check back for that....

also--please go over to the Handmade Olympics and vote for my Noah's Ark Quilt! Thanks so much to those that have already voted :).

Wednesday, February 10, 2010

Reverse Applique Quilted Coasters

 
My tutorial for these heart coasters is posted on the Sew, Mama, Sew blog today! Go check it out!

(and--please go vote for my Noah's Ark Quilt, if you haven't yet! thanks!)

Tuesday, February 09, 2010

hen and chicks

 
I made a few more chicks today and their mother hen for DQS8. At first I didn't like the hen (these are colors I hope my quilt swap recipient will like but they wouldn't be my first choice for me, you know?) But after I added the polka-dot comb I decided I like her. 

Paper piecing can get confusing, I didn't get the right number of chicks facing the way I wanted so I might make a couple more; I want most of them to be following behind her.  I turned one of the chicks over so you can get a better idea what they will look like finished.

I am still planning on making some eggs but I'm not sure about how the quilt will be arranged yet. Maybe with a vertical row of eggs and some Collaborative Quilting-style wonky stars or shoo-fly blocks too. 

p.s. if you haven't voted yet, please check out the Handmade Olympics at Rikrak Studio and vote for my Noah's Ark Quilt! (You can only vote once, voting is open until 2/17.) I looked through all the categories and I love all the quirky things (especially the elephant) in event 7, check it out! :)

Monday, February 08, 2010

The Handmade Olympics

I am so excited that I made the short list in the "favourite handmade goodie for kids" category over at the Handmade Olympics! (Thank you so much, Candy, for nominating my quilt!)

Here is my entry:

This is my niece's baby quilt that I finished making last April. You can read more about it here if you want.

The Handmade Olympics are being held over at the Rikrak Studio--you can go and vote for your favorites in 8 events/categories:
 handmade item with innovative design
handmade for kids
eco-friendly handmade goodies
goodies that inspire loveliness and wellness 
those who forward kindness through handmaking
thrifty and sustainable blogs, shops, or sites
handmade/vintage item that's fun!
blog with a handmaking focus

I would love it if you head on over and vote for me (I'm in category 2). 

thank you!

Saturday, February 06, 2010

birthday service

I came across this birthday service project via V and Co. today. I think it's such a brilliant idea and I totally want to do a service project for my birthday this year. I have 7 months and 1 day until my birthday. (oh it is after midnight so 7 months exactly). I am going to be thinking about what I want to do and how I can invite my blog friends to help me in some kind of service project. This makes me excited for a different kind of birthday this year!

Friday, February 05, 2010

Sew and Tell Friday--baby dress

Hey, I actually have something I can post for Sew and Tell Friday!

I still need to get buttons for this (and sew them on/make buttonholes) but I wanted to show it off now.


The pattern is from Sew for Toddlers by Kerstin Martensson, the 1979 version. My mom made dresses for me and my sisters using this book. I lined the bodice and added interfacing to the back opening and collar. I also shortened/updated the sleeves a bit. The sleeve edges are bound with bias cut self-fabric and these sleeves are really tiny so I hand basted the binding on before sewing it--pins just weren't going to work.

If I make this pattern again I think I might add some pleats in the bodice front or something else for added interest. This fabric doesn't really need any extra details though.... I might add a little length to the skirt too, in the future.

Head on over to Amy's to see more Sew and Tell projects!

Wednesday, February 03, 2010

chicks

 
I started making some chicks for my DQS8 quilt. I am going to make twin quilts this time and keep one. I'm making mod chicks and traditional chicks. Cute, huh? Ok, they will look more like chicks when the seam allowances are sewn and details are embroidered. 

Can you believe I enlarged the pattern for these 200%?

I am also going to make some eggs.

Monday, February 01, 2010

no reply commenters (your blogger profile)

Hi friends, I just wanted to bring something to your attention, relating to blogger profile settings. I didn't even really understand this until a few weeks ago. I like to, and I try to respond to the comments I receive here, but sometimes I can't because you have your profile set to "no reply". If you could kindly change that, I will try to write back to you when you leave me a comment. All you need to do is go to blogger.com, click on "edit profile" and then "show my email address."

Amy over at Park City Girl has some more information on this if you're interested! Thank you!

p.s. DL and Eileen I'm talking to you, among others :)