Showing posts with label quilting. Show all posts

Thursday, December 09, 2010

quilted

shirt quilt, quilting finished

The quilting on this quilt went very quickly--big meandering stitches. (Not big stitches--well a few, but they were mistakes. Big meanders.)

shirt quilt back--quilted

Now that the quilting on this is done, I feel like my huge sewing stress of the last couple weeks has mostly lifted. I have a couple more handmade things that need to be finished in time to mail for Christmas, but they are small and won't take too long. And I have a couple more handmade things on the list that will be staying here, too.

Do you know about Giveaway Day? Sew, Mama, Sew hosts this a couple times a year. The next one starts on Monday so be sure to come back here for my giveaway then. Also, you can go to the Sew, Mama, Sew blog next week for links to hundreds of giveaways of handmade items or supplies for making stuff.

Wednesday, November 10, 2010

Wordless Wednesday

Published with Blogger-droid v1.6.5

Friday, February 26, 2010

Chicken Quilt Block Tutorial


Here are instructions for making a chicken quilt block. This block is 7x8 inches as shown and will end up 6.5x7.5 inches when sewn into a quilt. All seam allowances are 1/4".
 
Step 1: Cutting. 
From your chicken body fabric, cut a rectangle 5.5x6.5 inches, and a 2x2 inch square. 
From your background fabric, cut 3 squares, 2x2 inches, a strip 6.5x2 inches, and a strip 5.5x2 inches. 
From your beak fabric, cut a 1.25" square. 
From your comb fabric, cut 2 rectangles about 2x2.5 inches.
 
Step 2: Draw diagonal lines on all your squares except for one of the background fabric squares. Mine are kind of light, I will make up for that by stitching them in a bright color so you can see them better! (It was a good excuse to not change my thread.)
 
Step 3: Stitch on all the diagonal lines as shown in the above photo. The stitching on the tail square doesn't show up really well--it goes from the upper left corner to the bottom right corner. 


Step 4: Trim the excess fabric along the seams you just sewed, leaving about 1/4" seam allowance.

Step 5: Press your seam allowances toward the darker fabric. Also, draw a comb shape on one of the comb fabric pieces (this didn't show up very well in my photo, sorry). You can use a water soluble marker or whatever else you have on hand. I used a regular pen and will put the side with ink facing backwards when I stitched it into the block. Place the 2 comb fabric rectangles wrong sides together. 
Step 6: Sew close to your comb shape drawing, and cut out the comb shape close to your stitching. Pin the comb so that the bottom edge lines up with the bottom edge of the upper left rectangle and the right side is about 1/4" in from the right edge of that rectangle. You can baste it in place if you want, or not. 
 
Step 7: Sew the two left pieces and the two right pieces together. Press the seam on the left side down and the seam on the right side up.


Step 8: Sew the right side and left side together, nesting the seam allowances so they match up well. Press that seam and you're done! 

If you make a chicken quilt block using this tutorial, I'd love to see it! Can you think of any variations? Maybe a patchwork chicken, maybe a wing, maybe a change in size... I might have to make a couple more of these.

Also I would love to see your chicken blocks on instagram, feel free to tag me @vickidjl and use the hashtag #chickenquilt.
 
Update March 2025
All images and designs are copyright protected. Please feel free to share the link to this blog post. Do not sell patterns based on this block or rewrite the instructions for this block to distribute to others. You may use this tutorial to make personal projects as well as items you make for sale. Thank you for respecting my intellectual property and copyright.


Friday, January 23, 2009

this week's sewing

I made some fun things this past week. Last week after finishing my scrap quilt top, I sewed up a sweatshirt for myself. I took a lovely self-portrait but the bathroom mirror was dirty so I'm not sharing it, sorry. It's a nice lightweight sweatshirt knit I got from fabric.com and I really like it. I was happy to make something that was finished so fast after working on that quilt top for so long.

Then I made this baby outfit that I had cut out and waiting:


I was trying to make the top into a dress but it's not a dress, just a cute long shirt. I like it anyway. The patterns are from Ottobre Design, 4/2004 for the pants, and 5/2006 for the top (but I changed it).

The Kansas City Star had the first Block of the Month pattern for 2009 in last Sunday's paper. I decided to sew it up in a non-traditional colorway.


If someone knows the trick for doing those tiny 9-patches without them ending up smaller than the other block components, let me know. All those seam allowances made it so the block didn't go together as well as I would have liked. It was fun to make.

I also made my donation block for Project Improv. This was a lot of fun to make; I think it came out looking pretty good and I have some more ideas for whenever I do this kind of block again.


These two blocks were both 12.5", way bigger than what I usually do.

Finally, here's a tiny glimpse of a secret project I'm working on. I need to get to the quilt shop to buy some more colors I need for this project.


Next up--I am making another pink fleece hat for my baby. She outgrew her old one. Other things on my list:
*more churn dash blocks
*maybe add a scrappy purple border to my scrap quilt, then baste and quilt it
*vintage baby dress--I got this pattern at JA when Simplicity patterns were 99 cents last week but missed out on some other patterns. Next time I need to go closer to the beginning of the sale instead of the end.
*finish knitting baby hat (I'm making the Marley hat shown here)
*Valentine's redwork stitchery--isn't that cute?
*work some more on the secret project

I looked through the patterns on the Simplicity site and found a few things I want to make for myself--I'm getting ready for the next pattern sale, whenever it is, and spring. I like the short sleeved button-up view of this top, and am hopeful that it will work out ok for me based on the reviews at patternreview.com. And they have a bunch of cute skirt patterns, too.

Oh yeah, I also wanted to share a couple of free block of the month projects I found recently. Here's a fun Noah's Ark project, and I really like the looks of this project, too. Who knows if I will get around to making them but I'll keep them in the back of my mind for now.

Monday, September 24, 2007

Quilt Binding Tutorial

This tutorial is for binding a quilt with straight edges using binding strips cut on the straight grain from your own fabric (not purchased binding).


First of all you need to cut your binding strips. I used strips that were 1 7/8" wide but if it's your first time you should probably use 2 1/4" or 2 1/2" strips. You'll have to figure out how many strips you need to go all the way around your quilt with several inches to spare. You can use math, or cut the strips and physically lay them around the edge of the quilt until you have enough. I've done scrappy quilt bindings before using several different fabrics, and used the physically-laying-it-out method for those quilts.


Using the angle lines on your ruler or mat, cut the ends of the strips to a 45 degree angle.


Cut both ends the same way so the strips are very long parallelograms.

To get them ready to piece together, set two strips next to each other.


Then, flip one over on top of the other so the edges line up for sewing. You will sew a 1/4" seam, so they need to line up 1/4" in from the edge. Pin it.

Sew it. Sew all the strips together this way. The diagonal seam here helps spread out the bulk of the seam, since you'll be folding the binding strip over itself a couple times.

Go to the ironing board; press the binding seams. I press to one side, you can press them open if you want but that's more work.


Now press the entire binding strip in half the long way.


Next, find the end of your binding strip. If your parallelogram went the opposite way from mine, cut the corner off so it points the way mine does in this picture. Press the short edge in 1/4".


Fold it in half lengthwise and press this end again.


You can't really see it in this picture, but I'm leaving it anyway. Lay out the binding around the quilt, with the end you just fiddled with in the middle of one of the sides. Check the seams on the binding to make sure there aren't any of them on the corners of the quilt. If there are, adjust your starting position. Pin the binding in place at the starting position and go to your machine.


For the entire perimeter of the quilt, you need to match up the binding and quilt edge and sew 1/4" in from that edge. I leave the extra backing and batting until after the binding is sewn on. To begin, you will be making a little slot to put the end of the binding in when you get back to your starting place. Open up the fold of the binding and sew down just the bottom layer for about 2 inches. Stop sewing and cut your threads.

Edited 9/2012: *For another way of finishing up the beginning and end of your binding strips (with a diagonal seam) see this blog post.*

Now fold the binding back up and start sewing both layers of the binding down, about 1 3/4 inches down from the beginning.


Sew the binding down that first side. I found that it helped if I pulled the binding a bit taut while sewing. When you get to the corner, stop sewing 1/4" from the edge of the quilt top. Backstitch and cut your threads.


Now, turn the quilt 90 degrees, and fold the binding straight up. Hold that diagonal fold with your finger.


And now, fold it down. You might want to pin.


Start sewing the next side at the edge of the fabric; stop 1/4" from the edge and do the corner thing again. Repeat until you've done all 4 corners.


When you get back around to where you started, you need to trim the end of your binding strip so it will fit in the little pocket you made at the beginning. I trimmed the end of my binding strip so about 1/2" of it went into the slot area past the angled part of the beginning of the binding. You have to look closely to see it in this photo.


Now you get to trim the quilt. For the 1 7/8" binding, I needed to cut the backing and batting right up to the edge of my binding. For wider binding strips, leave a little bit of batting beyond the edge. I have had a couple quilts in quilt shows and one of my judging sheets once explained that it's better (in official quilt world, I guess) to have the binding kind of puffy and nicely filled out than to let it be saggy, limp, and empty. In other words, I got bad marks for not having puffy binding, so learn from my mistakes.


I hand sew the binding to the back of the quilt. I use a ladder stitch, it's my main hand sewing stitch that my mom taught me when I was little. You can use whatever stitch you like. I try to sew the binding down far enough to cover the machine stitching that sewed it to the front of the quilt.


When you get to the corner, trim the seam allowance a bit more than you did on the straight edge.


(I'm left handed. If you aren't, this picture may not look quite right. I sew from the left to the right.) I try to fold the binding down on the top side of the corner, and sew it down past where the seam turns the corner.


Then, I fold the next side down and stitch it in place. I usually put a couple stitches in the binding where it folds on top of itself (the mitered corner), and then continue sewing down the next side of the binding.


All done! I hope this make sense. As always, comment or email me at vickivictoria at the google email service if you have questions or comments!

Monday, September 10, 2007

Free Motion Machine Quilting Tutorial

Machine quilting takes practice, but it's much faster than hand quilting and I love the look when it's finished. It's probably a good idea to make some 12 inch "quilt sandwich" squares of batting in between two layers of muslin and practice quilting those first. And also, know that it takes time and practice to develop this skill. Your quilting will improve with each quilt.

So... here we go!


There are several things you need to do to get your machine ready to machine quilt. You need a darning or free motion quilting foot. The special thing about this foot is that it goes up and down with the needle while you are sewing. This makes it so you can move the quilt any way you want while you are quilting it.

Lower the feed dogs on your machine. I have read that if your feed dogs don't go down, you can tape an index card over them. I haven't tried that though. You don't want the feed dogs telling your fabric which way to go; you are going to be moving it with your hands.

If your machine has adjustable presser foot pressure, you probably need to adjust it so there is space under the presser foot when the lever for the foot is in the down position. You have to have the presser foot in the down position in order to have top thread tension; if you don't have top thread tension, you can't sew. This picture shows the little black dial to adjust the presser foot pressure on my old Viking machine.

Your machine may not have adjustable presser foot pressure; one of my sewing machines does not. I can still machine quilt with that machine because it has a quilting foot that goes up and down with the needle while I sew.

I'm sure there are other types of machines and setups for machine quilting, but I only have experience quilting with two types of sewing machines. Whatever you need to do to get ready to machine quilt, you need to have your presser foot go up and down with the needle when you sew.

And finally, don't forget to change to a new needle. They actually make machine quilting needles, which I have used, but I haven't noticed a difference between those and regular universal needles.

Get some machine quilting gloves or other gripping device. I got my gloves at a local quilt shop, and I like them. They have plasticky gripper dots on the fingers and palms and make it much easier to move the fabric around while I'm quilting. There are also other options for helping you get some grip on your palms and fingers and you can find them if you do a search for quilting notions or quilting gloves.

If your sewing machine has a table extension thing, use it. If your machine fits into a cabinet and you have a flat surface, that's even better.

Next you need to get your quilt ready to fit on the machine. This is a baby quilt that's about 36"x42". It's not that difficult to quilt, but bigger quilts require more wrangling and patience. For a baby quilt, I quilt half of it, lengthwise, at a time. First, roll one side in to the halfway point; this side will be to the left of my needle.

Then, roll the other side in a little bit, leaving 5-6" or so unrolled in the middle.
(With larger quilts, you will probably do 3 or 4 or more sections of quilting, adjusting how the quilt is rolled up each time.)


Next, take the quilt and accordion-fold it from the bottom. The folded part will be placed in your lap and you will start quilting at the top.


First, position the quilt, lower the presser foot, and then using the hand wheel (is that what it's called?) take one stitch and pull the bobbin thread to the top.

Make sure the needle is right above where the bobbin thread comes up, and sew 3-4 stitches in one place. This anchors the threads and then, ta da! You are ready to quilt. You will need to pull the bobbin thread up like this each time you start stitching.

My son, who is 7, took this picture. It is supposed to show my hand position when I'm starting quilting. It's not the best angle to actually show that, sorry.

I quilted over to the right side of the quilt, unrolling it a bit as I went.

When I went back to the left, I had to roll up the right side of the quilt again.

I ran out of bobbin thread so I decided to take a picture and show you how it looks so far. You might want to make sure you have a full bobbin, or two or three, before you start. When you stop quilting (on purpose that is, not when you run out of bobbin in the middle) you need to sew 3-4 stitches very close together to keep your quilting line from coming undone. When my bobbin runs out, I just start sewing about 1/2" before the spot where my bobbin ran out, and sew right on top of those last few stitches.

Here's the back.

In this picture, I'm getting close to the bottom of the quilt. I find it helps control the motion of the quilt if I fold the top of the quilt under as I get closer to the bottom.

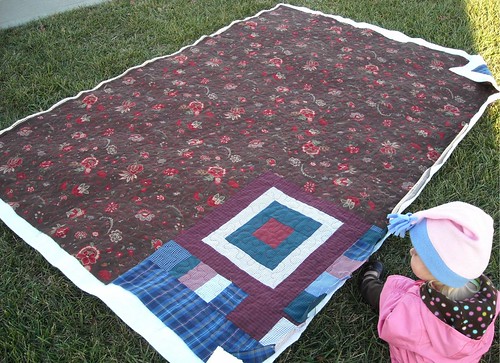
This is the quilt with the first half of the quilting finished.

This is the back of the quilt, showing a little closer up view of the unquilted and quilted areas. After you finish quilting the first side of the quilt, you will need to lay it out again, and roll up the already quilted side so you can quilt the other side. Try to make the second section of quilting blend in with the first section.

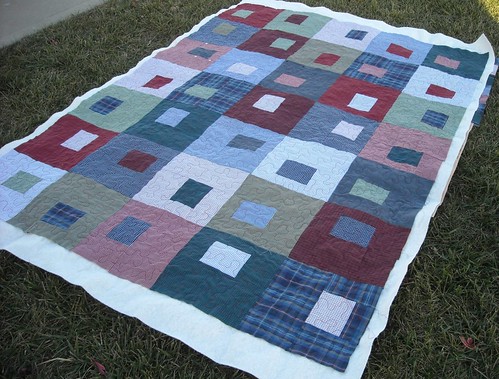
This shows the quilting all finished.

Here is a closer view of the quilting from the back. And, a little discussion about the meandering style of quilting that I used on this quilt. Meandering is a kind of curvy quilting that typically has smooth curves, no sharp (or blunt, I guess) corners, and lines that don't cross over each other. If you look closely at this quilt you might see some loops in my quilting; I got stuck and had no other choice. Plus, there are no quilting police. Also in meandering, you should try to keep the distances between quilting lines relatively even.

When you are practicing, I'd suggest trying meandering, in different sizes (when it's smaller it's called stippling). You could also try writing your name, drawing pictures, making loops, or whatever you want. You just want to get used to the feel of moving the quilt with your hands while you're pushing the pedal with your foot. Which brings me to stitch length: there are long arm machines and Berninas with stitch regulators that help keep your quilting stitches a uniform length. If you're just quilting on a regular machine, you'll need to be your own regulator. You don't want to have stitches that are overly long or too short. You'll need to experiment to see what stitch length works for you. You might want to try going faster (via the foot pedal) than you think is necessary and then figure out the right speed to move the fabric with your hands.

Let me know if you have any questions or if you have some quilting you want to show off!


EDITED to add:
When I machine quilt, I start in the middle section and usually go left to right in a section about 8-10 inches wide, and then go back and forth while I'm moving down the quilt. Then when I get to the bottom, I clip threads, re-roll the quilt, and start again on one of the sides (or slightly over from the middle, if it's bigger than a baby quilt).