
Here we are with just a few short weeks of shopping time left until Christmas. Are you having a hard time coming up with gift ideas for your favorite quilter? Here's a list of 10 gift ideas for quilters.
1. Flat Flower Pins. While I was working on quilt bindings for Project Improv I had a bunch of these extra long flower pins of Jacquie's. I gave them back to her a couple weeks ago, and I miss them! I haven't bought new pins since about 8th grade so I'm hoping some of these pins end up in my stocking on Christmas morning.
2. Curved Safety Pins. Great for basting quilts before quilting.
3. Needles. I like this multi-size package of hand sewing needles.
4. Box of 100 Schmetz universal sewing machine needles. Changing your needle often is a good thing!
5. Fabric! Moda precut fabrics like charm packs, honey buns, and layer cakes are all good choices.
6. Gift Certificates are good gifts too! You can get gift certificates for the large chain stores as well as your local quilt shops, and don't forget there are many great online quilt fabric shops. Here are a few that I like: Crazyquiltgirl fabric shop, Pink Chalk Fabrics, and fabric.com.
7. Not exactly quilting related, but necessary: chocolate. I love Harry and David truffles. And Dove chocolate, too.
8. Time. I think most quilters would appreciate the gift of time to work on their projects. Especially those of us that are moms.
9. Rotary cutter blade 5-pack. Rotary blades are something that nearly every quilter uses and they need to be replaced fairly often.
10. Magazines! A few varied newsstand issues would be a great gift for a quilter, as would a subscription to a quilting magazine. Here are a few that look interesting to me:
Australian Patchwork and Quilting
Quilting Arts Magazine
Quilter's Newsletter
Quilter's Home
Did I forget something? If you sew or quilt, what would you put on a wish list? I'd love to know what you're hoping to receive (or give) this holiday season.
And, for more ideas and inspiration for quilty gifts, please visit Amy at Park City Girl and Natalia at Piece N Quilt. Happy Shopping!
Monday, November 30, 2009
Sunday, November 29, 2009
basic kids' cape tutorial
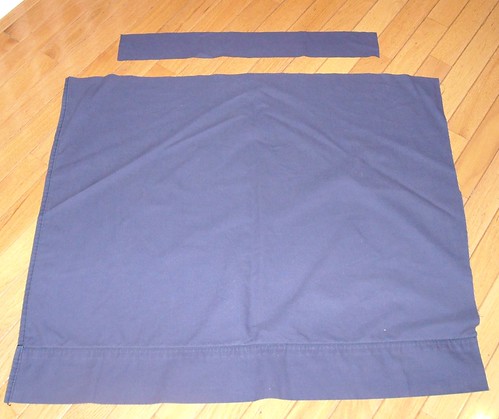
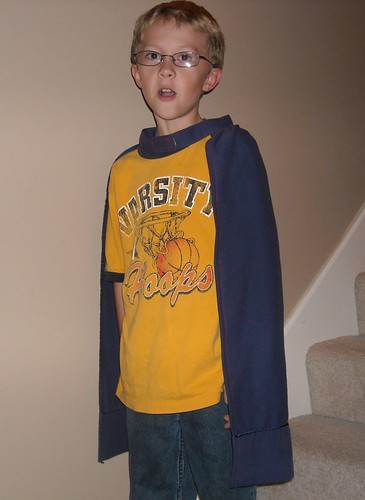
All right! Here are the instructions for making a basic kids' cape with a velcro closure. You can vary the length and width of the main cape fabric, or curve the corners for a rounded cape. You can also applique letters or designs or add pockets to the cape if you want. The capes I've been making are about 26" long and 30" wide. The first cape that I made, about 5 years ago when my oldest boy was 4, was a few inches narrower. I am making a bunch of capes from thrift store twin sheets now, and half the width of a flat twin sheet is the width of the capes.
1. Cut your cape body piece 30" wide and 26" long. Cut your neckband piece 22" long and 3" wide.
2. Hem three edges of your body piece, leaving the top unfinished. I used the existing side and bottom hems of the bedsheets when possible.
Fold the neckband piece in half lengthwise and sew across the short end, turn the corner and sew up the length of the band for 1-2 inches. Do this on both ends of the neckband, then trim your corners.
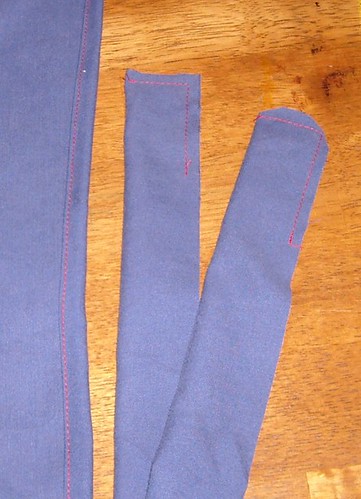
3. Turn the ends of the neckband right side out, poke out the corners so they are nice and square, and press. I also pressed one of the remaining unsewn edges under 1/4". (I don't know, it might be better to press them both but I got good results this way.)
4. Sew two rows of gathering stitches on the unfinished edge of the cape body. For more explanation on gathering, see here (scroll down to steps 12 through 16).
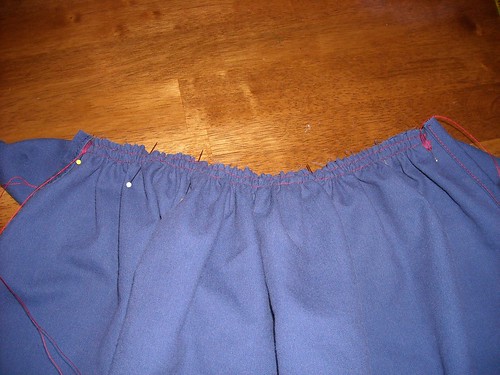
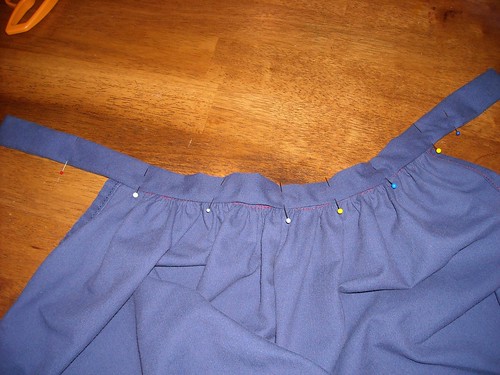
5. Mark the middle of one edge of the neckband and the middle of the cape body piece with straight pins.

6. Pin 'em together, matching up the centers.

7. Gather. Once I had gathers pulled up on each side of the center pin, I adjusted them so the cape body was gathered up to be about 6 inches long on either side of the center. Then, on each side, I pinned the edge, adjusted the gathers to spread them out and make them nice and even, and pinned some more.
8. Make sure you shorten your stitch back up, and sew the cape body to the neckband, stitching in between the two rows of gathering stitches. Remove the lower row of gathering stitches.
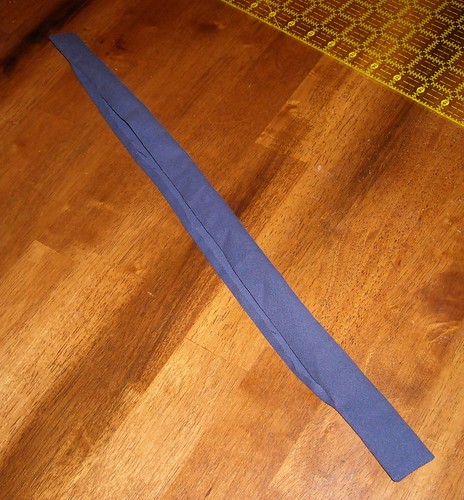
9. Starting in the center, fold the open edge of the neckband piece under 1/4 inch and pin the folded edge down right over the neckband/cape body seam.
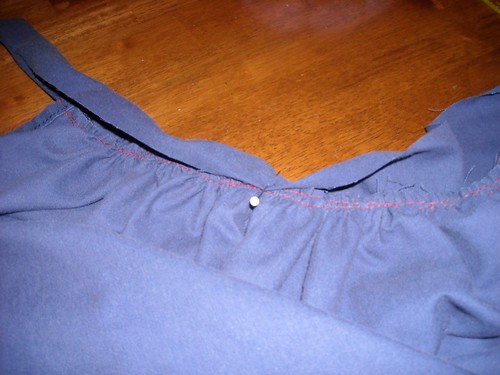
10. Continue folding the raw edge and pinning it down. The pins need to be fairly close together. This is probably the most fiddly part of making this cape. At the same time you are pinning the free edge down, you also need to make sure you are smoothing the back edge of the neckband up from where it is sewn to the gathers of the cape.
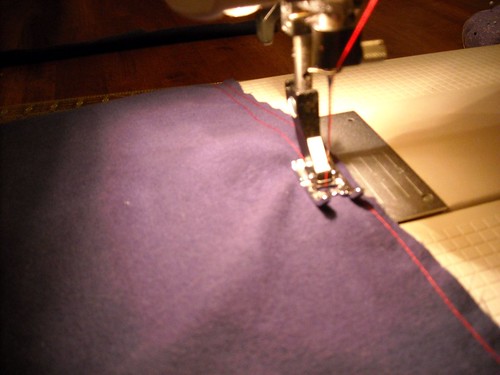
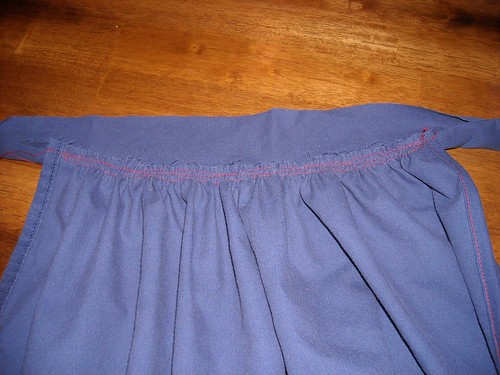
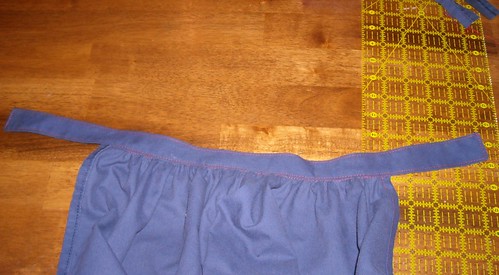
11. Next is topstitching. Topstitch around the whole neckband, starting at the right side of the neckband with your folded and pinned edge on top. Topstitch the gathered edge that you pinned first, and then continue around the rest of the neckband.

12. Here's what it should look like with the topstitching all finished.
13. Cut some hook and loop tape, about 1" or 1 1/4" long. The edges of the neckband need to overlap, so pin the loop side of the tape on the front of the neckband, and the hook side on the back.
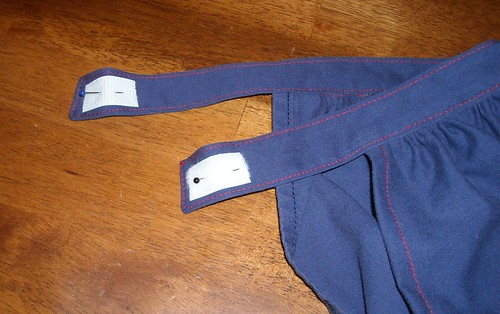
14. Use a zigzag stitch to sew the hook and loop pieces to the neckband.
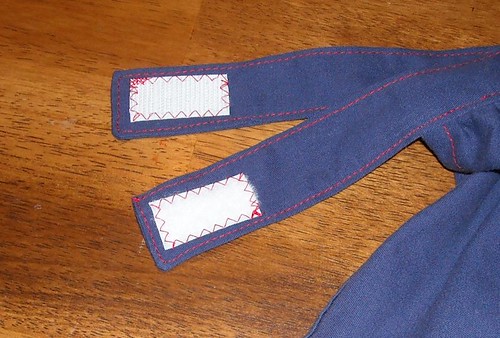
15. You're done!
1. Cut your cape body piece 30" wide and 26" long. Cut your neckband piece 22" long and 3" wide.
2. Hem three edges of your body piece, leaving the top unfinished. I used the existing side and bottom hems of the bedsheets when possible.
Fold the neckband piece in half lengthwise and sew across the short end, turn the corner and sew up the length of the band for 1-2 inches. Do this on both ends of the neckband, then trim your corners.
3. Turn the ends of the neckband right side out, poke out the corners so they are nice and square, and press. I also pressed one of the remaining unsewn edges under 1/4". (I don't know, it might be better to press them both but I got good results this way.)
4. Sew two rows of gathering stitches on the unfinished edge of the cape body. For more explanation on gathering, see here (scroll down to steps 12 through 16).
5. Mark the middle of one edge of the neckband and the middle of the cape body piece with straight pins.
6. Pin 'em together, matching up the centers.
7. Gather. Once I had gathers pulled up on each side of the center pin, I adjusted them so the cape body was gathered up to be about 6 inches long on either side of the center. Then, on each side, I pinned the edge, adjusted the gathers to spread them out and make them nice and even, and pinned some more.
8. Make sure you shorten your stitch back up, and sew the cape body to the neckband, stitching in between the two rows of gathering stitches. Remove the lower row of gathering stitches.
9. Starting in the center, fold the open edge of the neckband piece under 1/4 inch and pin the folded edge down right over the neckband/cape body seam.
10. Continue folding the raw edge and pinning it down. The pins need to be fairly close together. This is probably the most fiddly part of making this cape. At the same time you are pinning the free edge down, you also need to make sure you are smoothing the back edge of the neckband up from where it is sewn to the gathers of the cape.
11. Next is topstitching. Topstitch around the whole neckband, starting at the right side of the neckband with your folded and pinned edge on top. Topstitch the gathered edge that you pinned first, and then continue around the rest of the neckband.
12. Here's what it should look like with the topstitching all finished.
13. Cut some hook and loop tape, about 1" or 1 1/4" long. The edges of the neckband need to overlap, so pin the loop side of the tape on the front of the neckband, and the hook side on the back.
14. Use a zigzag stitch to sew the hook and loop pieces to the neckband.
15. You're done!
Saturday, November 28, 2009
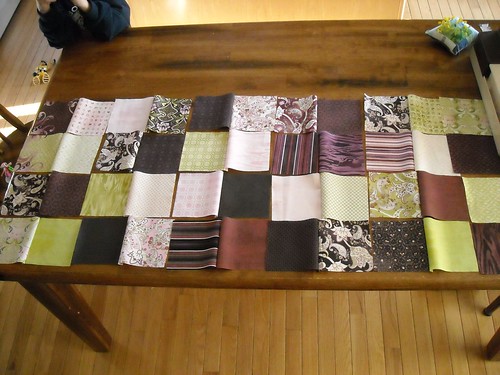
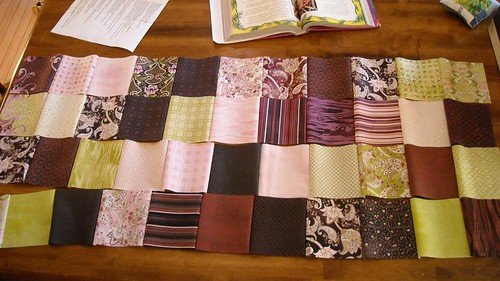
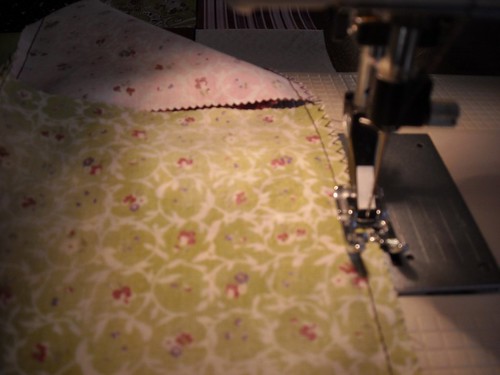
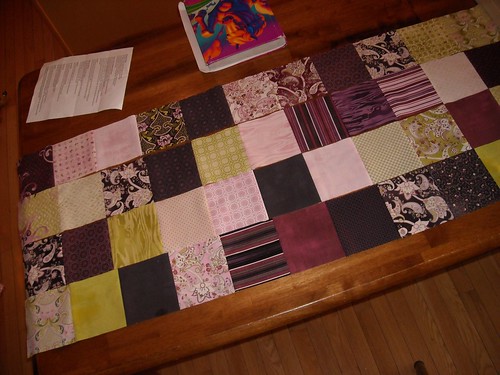
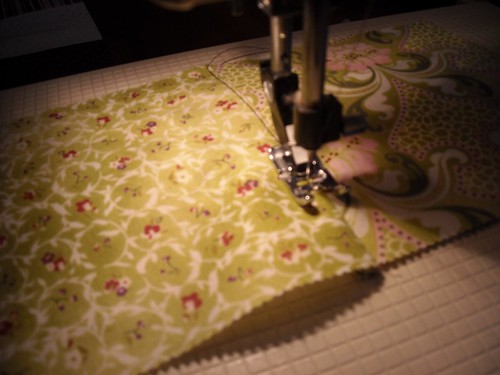
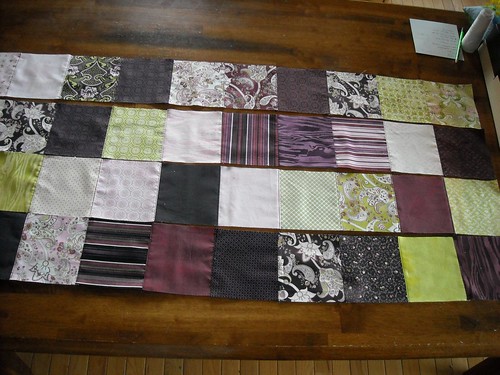
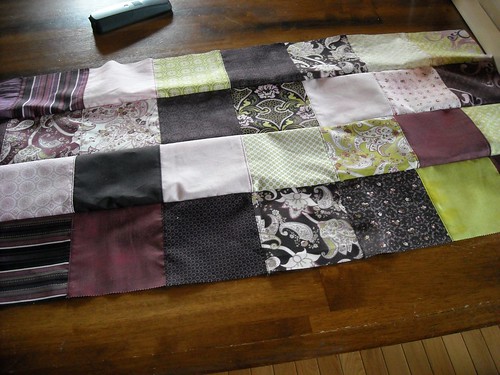
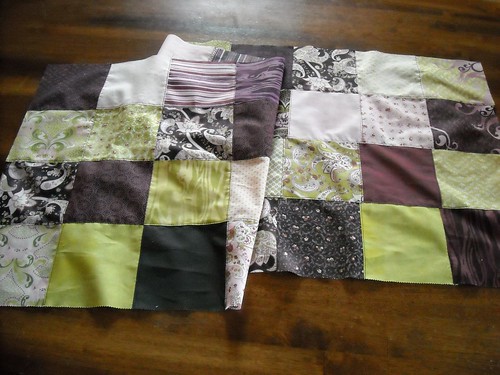
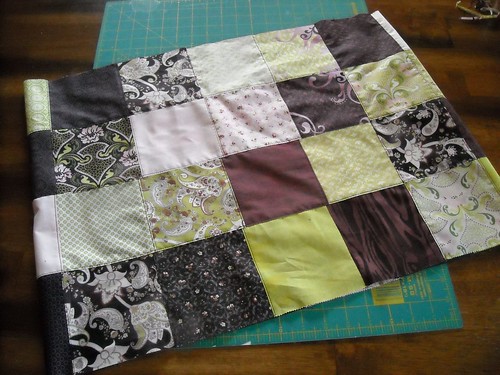
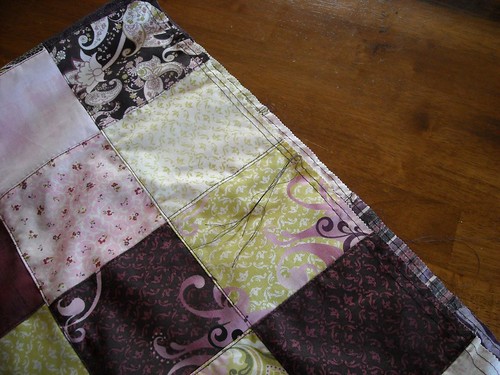
quilt top
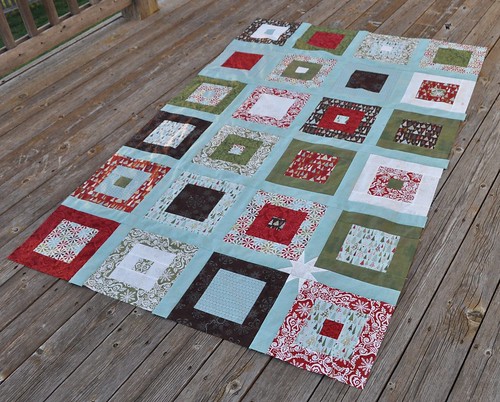
It still needs the outer sashing/border strips. But I think I will try to do something about those two shorter rows in the middle; ease the sashing strip in a bit better perhaps.
It felt good to get this far and be able to clean up all my figgy pudding mess for a few days. I still really like this fabric line!
Friday, November 27, 2009
Black Friday
I was hoping to have a finished quilt top to sew-n-tell about but I didn't get it done yet. I did make it up to JoAnn's for the sale. I got 13 yards of flannel and some other things, too. This will be the first year for matching Christmas jammies for my kids! Actually I got two different snowman prints; they were a little lean on the holiday flannel. They had a super-secret short cutting line at the home dec table that saved me a little bit of time.
Thursday, November 26, 2009
Happy Thanksgiving!
How's this daily blogging thing going for you, readers? I hope you're not too tired of me. Just a few more days and then I might take a break.
A couple things I wanted to share: Sew, Mama, Sew's Giveaway Day is coming up! Check in on December 2, I'll have finalized my little giveaway by then. And there will be lots and lots of other giveaways to enter over at the SMS site.
Something that I think is cool: Moleskine diary hack: 5 year diary. I got the large daily Moleskine diary about a month ago and have only missed one day since I started writing in it. The diary in the tutorial I linked there is the small one; with the big one, you get 6 whole lines to fill up each day. If you knew me back when, you know I used to always write in a daily journal, like for years and years, only missing a day or two here and there. Sadly, that habit has fallen by the wayside with babies and sleep deprivation and internet time wasting. But I'm getting back into it! Six lines at a time.
We had Thanksgiving dinner by ourselves. I worked really hard on that meal, and the boys helped with the rolls, stuffing, swedish potatoes (I love that Jacob calls them that) and corn. Cory helped with the clean up. Lauren helped with messing things up. We'll do the rest of the pans tomorrow, and eat leftovers for quite a while here. Hope you had a great day! Thanks for reading and commenting!
Wednesday, November 25, 2009
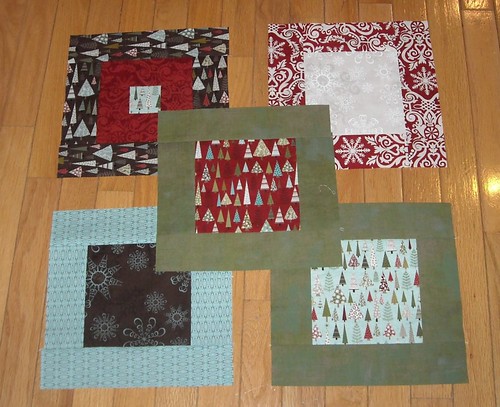
Christmas quilt blocks--finished
This was a pretty fun way to spend the day before Thanksgiving.

I snapped this picture right after baby got up from her nap because I knew she would cause destruction to my layout. Do you like how I left the cutest baby toes ever in the picture?
I finished an additional 5 quilt blocks after I took this picture, and I'm ready to sew the sashing on and put them all together. I think I'm going to get this UFO done, after all!
Tuesday, November 24, 2009
thankful ~2~
So I decided to go grocery shopping with all 3 kids after school today to get the fixings for our Thanksgiving dinner. It was going really well; I had a pretty good attitude and this one sample guy gave us a taste of breaded pork something with yum, cranberry/horseradish dipping sauce. Wow, it was good. Kids had free cookies, and there was an eggnog guy, too. The kids were behaving fine and I wasn't stressed out.
Anyway I was going back and forth across the whole store looking for things and a man sort of stopped me, put something in my hand and said, "Happy Thanksgiving." I looked down quickly and saw that it said "Happy Thanksgiving" and in the space for dollar amount, "$50". I turned and looked at him and said thank you, then told the boys what it was. I couldn't believe it. I had a lot of thoughts running through my head while I looked for the dang french onions and sweetened condensed milk, like "we don't need this, why me? I can't believe this." I did decide to go back to the hotwheels over by the dairy section and let Jacob pick out a $1 car to buy.
We got up to the checkout and my total was $54. I had thought about buying some of the food pantry (Harvesters) coupons that our store has so you can donate money. I went ahead and bought $20 of those since my groceries were pretty much paid for.
The cashier told me that I was the third person who had come through her line with a $50 gift card and that all 3 had been women with kids. Isn't that sweet? Makes me wonder about what kind of person does something like this. I need to figure out how I'm going to go ahead and pay forward the rest of the dollar amount I was given today. Or more.
I'm thankful for generous people who do crazy, random, acts of kindness and make me think about the goodness of people.
Monday, November 23, 2009
sneak peek
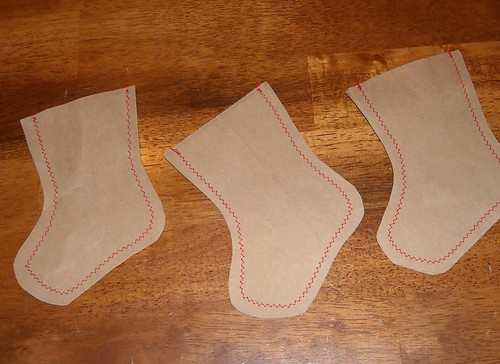
Only 21 left to make. I had one more cut out, but my bobbin ran out so I took that as a sign that I needed to stop. These would look good with pinked edges, but I don't have pinking shears.
I need to think about how I will decorate them. I don't have lots of papercrafting stuff here. I think white ink and snowflake designs would look good though.
Sunday, November 22, 2009
80s playlist for the weekend
I've been thinking, planning on what I need to focus on and what needs to be pushed back so I can get everything done I want to before Christmas. I have something cute in mind that I hope to be sharing later this week--something I thought about and then simplified so it should be much more easily accomplished. I am hoping to make a cape tutorial to share this week as well.
Here's a little weekend playlist for you--late 80s/early 90s. Pretty much a recap of my very first Columbia House order. Remember that?
A Girl Like You--The Smithereens
What I Am--Edie Brickell
Out of Control--Oingo Boingo
Half a World Away--REM
Walk on the Ocean--Toad the Wet Sprocket
As Long As You Folow--Fleetwood Mac
Misguided Angel--Cowboy Junkies
and a couple that were NOT from my late high school/early college days:
Don't Stop Believing--Glee version--being played, over and over, by my husband and 9-year-old
last but not least
Pi, Pi, Mathematical Pi--you HAVE to click on this one to see what I've been going through the last couple weeks. My son is memorizing Pi.
Notice I left off the beep beep boop song by Owl City. Don't like it. Overplayed on the radio and youtube at our house.
Saturday, November 21, 2009
thankful
Here are a few things I'm thankful for:
*spending time with my siblings and cousins on the cruise last week
*Grandpa for being so generous and taking us on the cruise
*having a warm house and enough food
*happy and healthy children and husband
*husband doing the grocery shopping--I love that!
*good friends
*good books
*good sleep
What are you thankful for?
I made 4 red capes for a customer (who is also a friend) today. Next up--blue and yellow capes. But not today.
Friday, November 20, 2009
some things I wanted to share

I made these iPod cozies for an "iTunes" themed raffle basket for my son's class. I made the one on the right first, and realized it didn't have a complete monkey on it. So I made the one on the left and sent it in. They are both lined in light blue interlock knit fabric. I guess it is supposed to be a little iPod sleeping bag to keep your iPod nano from getting scratched up (or scratching other things) in your bag. It wouldn't be something you would keep on the nano while in use, though.
I wanted to mention that I met knitting designer Nicky Epstein on my cruise. In the ironing room, of course (no ironing allowed in staterooms, too much risk of fire). I was up there ironing my skirt and Lauren's dress for formal night, and a couple of women came in to press some little knitted hearts and we chatted for a minute. The friend who was with Nicky told me they were on a knitting cruise, most of their group was from Houston, and that Nicky is a famous knitwear designer who has written 19 books or so. I saw them again while shopping in Cozumel and have to say that Nicky didn't remember me until I said, "remember, we met in the ironing room?" Check out her books--the knitted and crocheted flower books look very interesting.
Finally, have you heard about this great flea market fancy giveaway?

Lots of Flea Market Fancy fabric and some books are up for grabs!
Have a great Friday everyone!
Thursday, November 19, 2009
UFO finish #1--Wreath of Doves
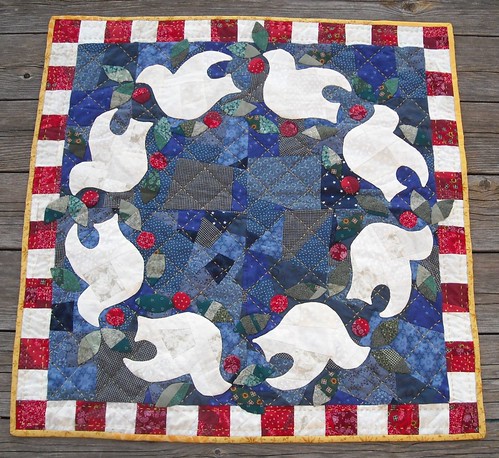
Yay, it's finished! It could still use a hanging sleeve and label, but I'm calling it finished. Here are some stats:
*Started February 2002 in Provo, UT, finished November 2009 in Kansas.
*Pattern is from American Patchwork and Quilting, I will look up the issue number later.
*Dove appliques were made by sewing the shapes right side to interfacing, then cutting a slit in the interfacing to turn them right side out. This way I didn't need to worry about keeping the edges in line as I appliqued them to the background.
*Berries and leaves were done in a needle-turn sort of method.
*Hand quilted with DMC perle cotton. I prefer quilting with 2 strands of embroidery floss; you can pop the knots to the inside.
*I didn't buy enough binding fabric the other day and I was NOT going back so I found a couple of similarly colored fabrics and did another monochromatic-yet-scrappy binding.
*I wish the leaves were made of lighter greens to contrast better with the blue backing.
Projects on my mind:
*some sort of Advent calendar, maybe made with wool felt stockings and mittens.
*long sleeve t-shirts for me, kind of fancied up.
Wednesday, November 18, 2009
Prematurity Awareness Day--Fight for Preemies
Today is dedicated to raising awareness of the crisis of premature birth. Every year, 20 million babies are born premature in the United States. You can go here to learn about the research being conducted on the causes and prevention of prematurity, and to learn what you can do.

I love this picture. Lauren at 2 days old.
Lauren was born six and a half weeks early, last October. She weighed 4 lbs 8 oz. I was hospitalized for a week before she was born, because my water had broken. She stayed in the hospital for 12 days and came home November 5, 2008, weighing 4 lbs 13 oz. She was on an apnea/heart monitor for a while and had several visits from home health nurses.
After several weeks, we were getting ready to take her off the monitor, actually we stopped putting it on her for about 3 nights, and then we noticed one evening that she was having some problems breathing. We still had the monitor and put it back on her that night and she had at least 6 serious apnea episodes throughout the night. Like turning blue (I cannot tell you how scary that is.) Did you know babies can turn blue from not breathing for only about 10-15 seconds? I wish I didn't know that from personal experience.
We went to the children's hospital early the next morning and eventually got settled in where Lauren was monitored and treated for bronchiolitis for about 8 days. (She didn't have the RSV virus but did have the same illness that RSV causes.) She was mostly there for monitoring but was also given some supplemental oxygen to help her body fight her way through the illness. After she came home she only had one or two apnea episodes in the next few days and then has been very healthy ever since (she got her first fever, ever, last week while we were on our cruise but she's almost all the way better now). We did decide to keep her on the apnea monitor at night until she was around 5 months old.
I am so grateful that Lauren is healthy and didn't have any lasting problems related to her prematurity. She turned 1 year old last month and is starting to take first steps here and there. She's sweet and easygoing and happy. She loves her baby doll and throwing balls. She doesn't like the vacuum or baths or people putting things on their heads.
I wish I could understand why this happened to us, and why so many babies are being born early. I had two full term babies, and really the only thing "high risk" about me during my pregnancy with Lauren was that I turned 35 the month before she was due. I did read on the March of Dimes website (I can't find a link right now) that having any type of infection during pregnancy can possibly be linked to premature birth. And I did have a not-terribly-severe but not fun episode of food poisoning in July while I was pregnant. Maybe that weakened my system and eventually led to my early ruptured membranes and early labor. I won't ever know for sure. We ended up with a healthy, happy baby, but it was a tremendously difficult experience that I am still not ready to share very many details about. I am glad we had the support of the March of Dimes and I'm going to look into finding out more about how our family can support the fight for preemies.
Tuesday, November 17, 2009
a few more fat quarters
I just got these babies at the quilt shop. I'm almost ready to finish a couple of my unfinished projects.
I decided to do the sashing for my Figgy Pudding Christmas quilt in the aqua "grunge" fabric. It will be a little blendy with some of the block fabrics, but I think I will really like it overall.
Look what I just read about on Corrie's Dutch Blue blog--a Holiday Traditions quilt contest. I might just have to enter both the small and large quilt contests over there.
I'm going to put them in the washer, right now!
Monday, November 16, 2009
a couple of giveaways
Working on catching up with my google reader, I came across a couple giveaways. First, go check out the Art Gallery Fabrics blog for a chance to win a copy of Quilts, Quilts, Quilts by Diana McClun and Laura Nownes. I wrote about this book a while back; it's a fabulous learn to quilt book.
And... have you heard about Hawthorne Threads yet? It is a new online fabric shop with LOTS of great fabric, and an interesting tiered pricing system.
They are giving away a Firenze bag kit (I adore this bag) and some fat quarter packs of Art Gallery Fabrics' Girly Girl line. Go check it out!
And... have you heard about Hawthorne Threads yet? It is a new online fabric shop with LOTS of great fabric, and an interesting tiered pricing system.
They are giving away a Firenze bag kit (I adore this bag) and some fat quarter packs of Art Gallery Fabrics' Girly Girl line. Go check it out!
Sunday, November 15, 2009
home again, home again
My wonderful grandfather took almost all of his married grandchildren, along with many of his wife's married grandkids, on a cruise to Progreso and Cozumel last week. We had a great time. It was so good to see so many of my cousins, some that I haven't seen for several years. It was really cool to meet my step-grandma's grandkids too, and become acquainted with them. It was definitely a wide range of interesting people. (My brother won the ship's drink-mixing contest, one of my cousins was second place in the hairy chest contest. Just a couple of examples.)
We got home last night and I'm still waiting for my land legs to come back; my world is still rocking back and forth.
The second night on the boat, my baby girl got a fever, and then a bad runny nose. We went to see the ship physician, just in case, and she was diagnosed with "just a cold." So we spent a lot of time holding her and helping her get to sleep. She's still sniffly so she and I are skipping out on church today.
I'm still overwhelmed by everything about the trip but a couple of highlights: chocolate melting cake (I had it 3 times plus ate some of my husband's the first night), the blue water at Cozumel, my first time eating at Hard Rock Cafe (and I got a really cool t-shirt there), having fun hanging out with my brothers and sisters (and their spouses). I am totally bummed that one of my brothers and his wife weren't able to make it.
Here's all the sewing I did on the ship:

So now I have 3, almost 4 hexagons completed. I decided these needed to end up as a small project, and I'm thinking about making a quilted heating pad cover with them.
We got home last night and I'm still waiting for my land legs to come back; my world is still rocking back and forth.
The second night on the boat, my baby girl got a fever, and then a bad runny nose. We went to see the ship physician, just in case, and she was diagnosed with "just a cold." So we spent a lot of time holding her and helping her get to sleep. She's still sniffly so she and I are skipping out on church today.
I'm still overwhelmed by everything about the trip but a couple of highlights: chocolate melting cake (I had it 3 times plus ate some of my husband's the first night), the blue water at Cozumel, my first time eating at Hard Rock Cafe (and I got a really cool t-shirt there), having fun hanging out with my brothers and sisters (and their spouses). I am totally bummed that one of my brothers and his wife weren't able to make it.
Here's all the sewing I did on the ship:
So now I have 3, almost 4 hexagons completed. I decided these needed to end up as a small project, and I'm thinking about making a quilted heating pad cover with them.
Saturday, November 14, 2009

Friday, November 13, 2009
what I've been reading
I just finished The No. 1 Ladies' Detective Agency by Alexander McCall Smith, and it was great. I will definitely be looking for the sequel.
I started reading The Princess Bride by William Goldman, again and it is pretty good but I enjoyed it more the first time I read it, probably when I was in college.
My husband bought Deja Dead for me to read on the trip. The author is Kathy Reichs, and she's the real person who Temperance Brennan on the TV show Bones is based on. I read one of her books a couple months ago and liked it pretty well so this should be a fun vacation read.
I am also reading Quilter's Home magazine. It is fun, and funny. Definitely a change from the traditional quilting magazines out there. I have the October/November issue and it has tons of great stuff--recipes, photos of new fabric lines, an article researching the best hand cream. And book reviews, and even a couple patterns. I subscribed for my birthday and am looking forward to getting the next issue!
Thursday, November 12, 2009
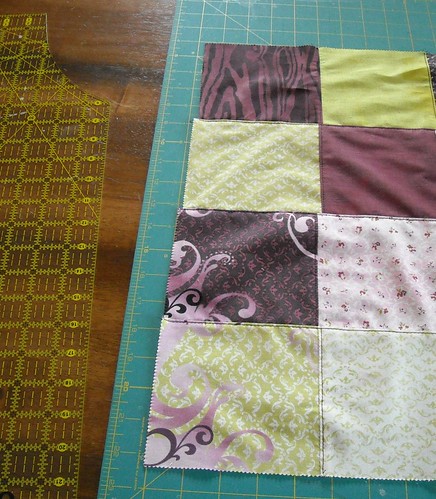
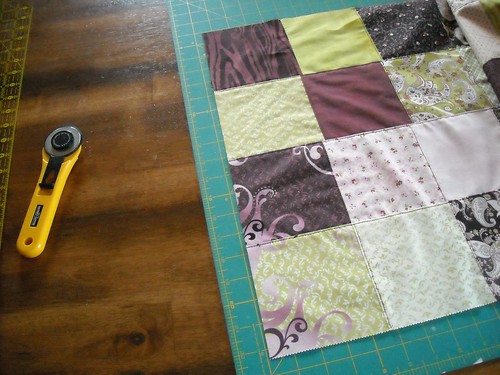
more Christmas quilt blocks
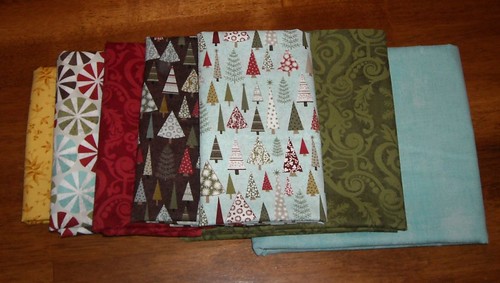
I got a few more of these blocks done. I need 9 more to finish the top. Will be going to Quilter's Haven for more Figgy Pudding fat quarters when I get home. Do you see how I forgot about the directional print in the brown trees there? Sigh.
Wednesday, November 11, 2009
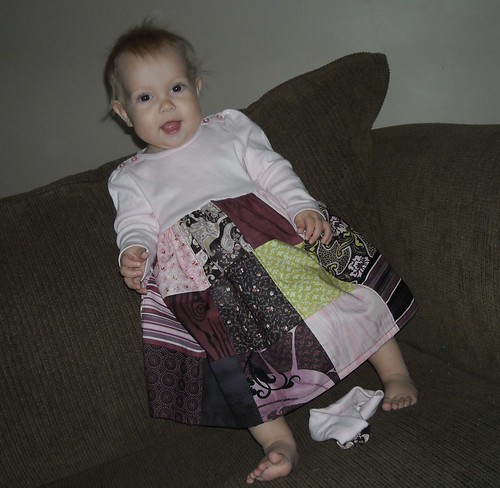
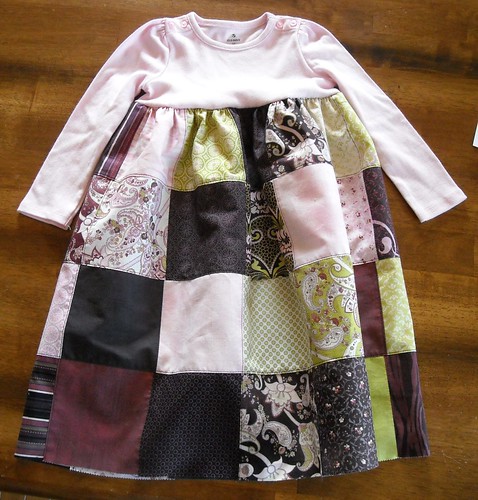
Tutorial: Charm Pack Dress
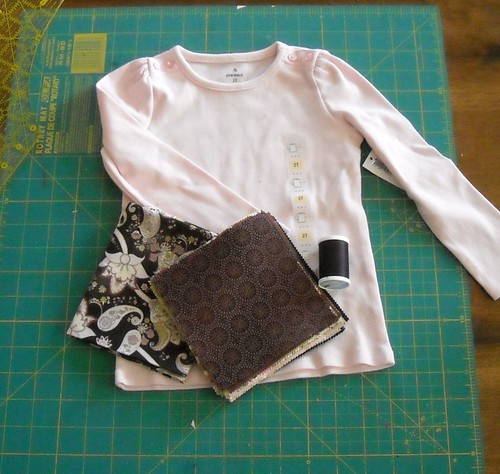
Here are instructions to make a charm pack dress for sizes 6-9 months, 12 months, and 2T.
What you need to get started: purchased t-shirt, charm pack, matching thread, one fat quarter or other matching scraps (for size 2T only), universal and ballpoint sewing machine needles.
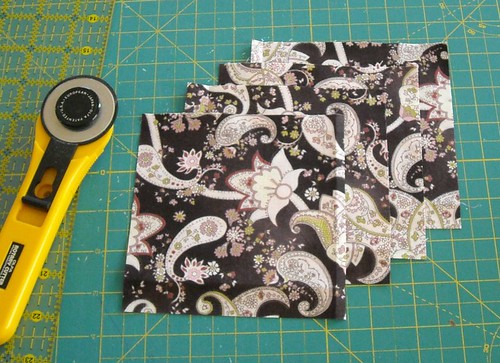
Step 1: For size 2T, cut out some 5" squares from your fat quarter. You will need a total of 44 squares for the skirt. I cut out 4 squares from my fat quarter but only ended up using 3. I am still going to make a matching yo-yo hair clippie from the last square I cut out.
For size 12 months, pick out your 30 favorite squares from the charm pack.
For size 6-9 months, pick out your 20 favorite squares from the charm pack.
Step 2:
Start sewing the squares into pairs. You can spend time arranging the squares before doing any sewing, and I did that the first two times I made this style of dress, but for the size 2 dress I sort of randomly sewed pairs of squares that I thought looked good together. Then I spent time arranging the pairs into rows. For a size 2 dress, pictured here, you will need 4 rows of 11 squares. So make sure you sew 20 pairs together, and then lay the rows out, adding another single square at the end of each row.
For size 12 months, you need 3 rows of 10 squares, and for size 6-9 months, 2 rows of 10 squares.
Step 3: Sew your squares into their rows. I used a 1/4" seam allowance for all the seams in this project.
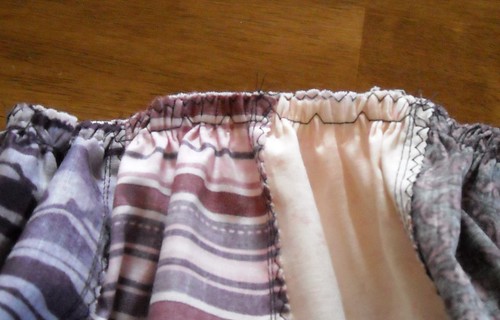
Step 4: Finish the seams. I am a major stickler about not leaving unfinished seams in pretty much anything besides quilts. These squares are pinked (except the ones I cut myself) and might do just fine without being zigzagged but my mom's lessons and my years of 4-H make it so I just can not leave these seams unfinished. I could have serged these seams but it was easier to just switch the sewing machine knob to zigzag so that's what I did.
Step 5: Press the seams. Press all the seams on each row the same direction, and then for the next row, press them all the other direction. This step is really important and I'm afraid if you don't press these seams well you will end up with a "home made looking" and not in a good way garment. Thank you.
Step 6: Topstitch. This is another step that makes the patchwork skirt look really good. I topstitched these seams a bit less than 1/8" away from the seam.
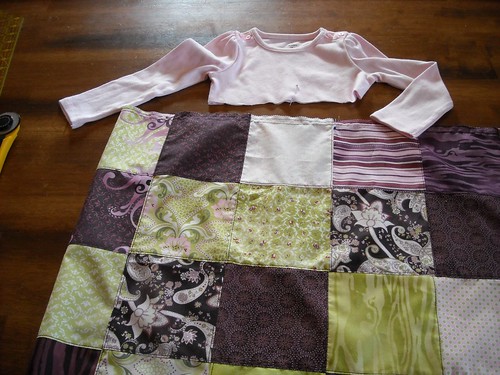
Step 7: Lay your rows out and admire them. This isn't really that hard, is it?
Step 8: Sew your rows together.
Step 9: Zigzag your seam allowances, press your seams all in one direction, and topstitch. Looks good!
Step 10: If you need to, straighten out your edges before sewing the skirt into a circle. (That is a sad broken ruler.)
Much better.
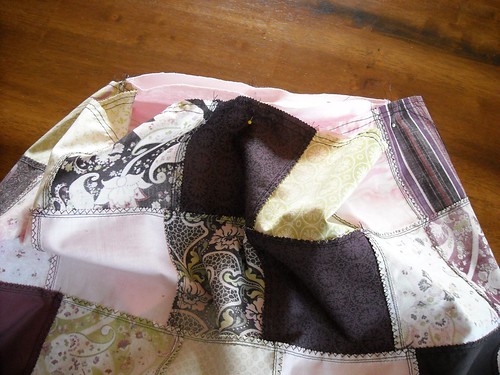
Step 11: Sew the skirt into a circle, zigzag your seam, press it, and topstitch it. Then turn the skirt around different ways until you find the side you want to be the front. Lay it flat and mark the side edges, at the very top, with pins.
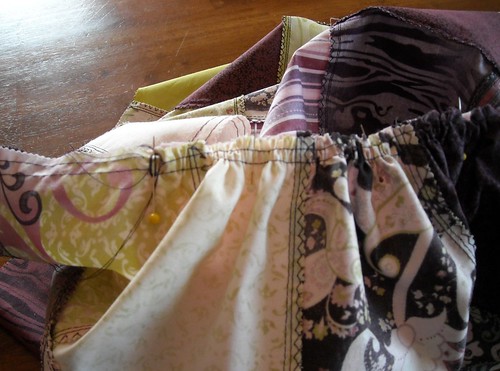
Step 12: Sew gathering stitches. Adjust your sewing machine stitch length to the longest possible length. Start at one pin and sew 1/4" from the edge to the other pin. Stop sewing and cut the threads, leaving 4-6" thread tails. Start sewing again close to where you stopped and stitch around to your first pin. Leave 4-6" thread tails on all the ends of these gathering threads. Sew a second row of gathering stitches 1/4" in from your first row, starting and stopping at the same places and leaving thread tails again.
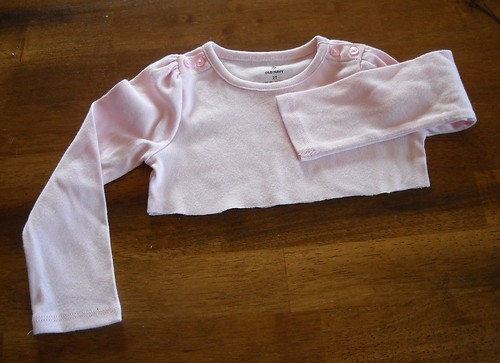
Step 13: Cut off your shirt. I cut this 2T shirt off 2" below the bottom join of the sleeve to the shirt. For the 12 month dress, I also cut off the shirt about 2" below the armpit intersection of the sleeve and shirt. For the 6-9 month dress, I cut the shirt off about 3.5" below the sleeve/shirt intersection. You can experiment with different t-shirt and skirt lengths and figure out what works for you.
Step 14: Use pins to mark the center fronts and backs of the shirt and skirt.
Step 15: Turn the skirt inside out and pin the shirt and skirt together, matching the center fronts and backs, and matching the side seams of the shirt with the places where you started and stopped your gathering stitches.
Step 16: Gathering. Hold onto the two threads from the side of the skirt facing you. Pull the threads while at the same time using your other hand to gather the skirt fabric. Pull the threads until the gathered skirt edge is the same length as the section of shirt you will be sewing it to. Gather from one side seam to the center front or back, and then repeat this from each side seam, until your skirt is all gathered up.
Once the gathered edge is the right length, I take the two threads and wrap them around my pin a few times to keep the gathers from falling out. Next, evenly spread out your gathers and pin a few times in between your center and side seam pins.
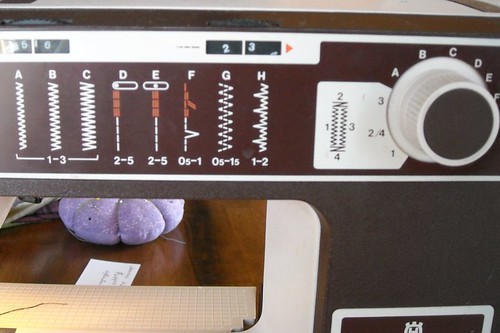
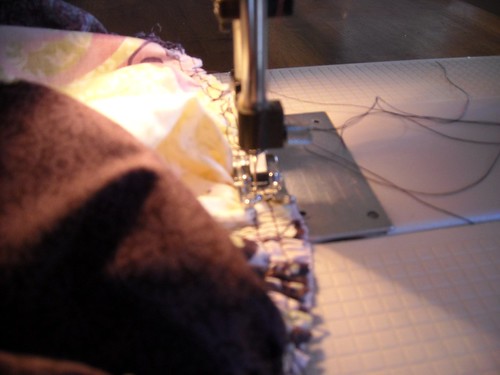
Step 17: Sewing skirt and shirt together. Change your sewing machine needle to a new ballpoint needle. You don't want a woven needle to put holes in your t-shirt fabric after all the work you've done! I chose a stitch with some stretch in it, stitch "F" on my machine. I worry that if I used a straight stitch that the seam would pop too easily since the t-shirt is meant to be stretchy and the dress is put on over the head. You could use a narrow zigzag stitch, or even serge the skirt and shirt together.
Sew the seam in between your two rows of gathering stitches.
Step 18: Take a look at how cute the dress is. Look closely at the bodice/skirt seam and make sure there aren't any unwanted folds or tucks in the t-shirt fabric. If there are, unpick them and fix them before you go further. Once the seam is good, go ahead and pull out all your gathering stitches.
Step 19: Zigzag the edges of this seam.
Step 20: Hem the bottom of the dress by folding the raw edge under twice and stitching near the folded edge.

Step 21: Press the hem. You're done!

So, there you go. I hope everything is explained clearly enough here, please let me know if you have questions or need clarification on anything.
I would love to see pictures if you make a dress using this tutorial.
Also, if you modify this tutorial for a larger size, please let me know so I can either link to you or include your modifications here, if you prefer.
What you need to get started: purchased t-shirt, charm pack, matching thread, one fat quarter or other matching scraps (for size 2T only), universal and ballpoint sewing machine needles.
Step 1: For size 2T, cut out some 5" squares from your fat quarter. You will need a total of 44 squares for the skirt. I cut out 4 squares from my fat quarter but only ended up using 3. I am still going to make a matching yo-yo hair clippie from the last square I cut out.
For size 12 months, pick out your 30 favorite squares from the charm pack.
For size 6-9 months, pick out your 20 favorite squares from the charm pack.
Step 2:
Start sewing the squares into pairs. You can spend time arranging the squares before doing any sewing, and I did that the first two times I made this style of dress, but for the size 2 dress I sort of randomly sewed pairs of squares that I thought looked good together. Then I spent time arranging the pairs into rows. For a size 2 dress, pictured here, you will need 4 rows of 11 squares. So make sure you sew 20 pairs together, and then lay the rows out, adding another single square at the end of each row.
For size 12 months, you need 3 rows of 10 squares, and for size 6-9 months, 2 rows of 10 squares.
Step 3: Sew your squares into their rows. I used a 1/4" seam allowance for all the seams in this project.
Step 4: Finish the seams. I am a major stickler about not leaving unfinished seams in pretty much anything besides quilts. These squares are pinked (except the ones I cut myself) and might do just fine without being zigzagged but my mom's lessons and my years of 4-H make it so I just can not leave these seams unfinished. I could have serged these seams but it was easier to just switch the sewing machine knob to zigzag so that's what I did.
Step 5: Press the seams. Press all the seams on each row the same direction, and then for the next row, press them all the other direction. This step is really important and I'm afraid if you don't press these seams well you will end up with a "home made looking" and not in a good way garment. Thank you.
Step 6: Topstitch. This is another step that makes the patchwork skirt look really good. I topstitched these seams a bit less than 1/8" away from the seam.
Step 7: Lay your rows out and admire them. This isn't really that hard, is it?
Step 8: Sew your rows together.
Step 9: Zigzag your seam allowances, press your seams all in one direction, and topstitch. Looks good!
Step 10: If you need to, straighten out your edges before sewing the skirt into a circle. (That is a sad broken ruler.)
Much better.
Step 11: Sew the skirt into a circle, zigzag your seam, press it, and topstitch it. Then turn the skirt around different ways until you find the side you want to be the front. Lay it flat and mark the side edges, at the very top, with pins.
Step 12: Sew gathering stitches. Adjust your sewing machine stitch length to the longest possible length. Start at one pin and sew 1/4" from the edge to the other pin. Stop sewing and cut the threads, leaving 4-6" thread tails. Start sewing again close to where you stopped and stitch around to your first pin. Leave 4-6" thread tails on all the ends of these gathering threads. Sew a second row of gathering stitches 1/4" in from your first row, starting and stopping at the same places and leaving thread tails again.
Step 13: Cut off your shirt. I cut this 2T shirt off 2" below the bottom join of the sleeve to the shirt. For the 12 month dress, I also cut off the shirt about 2" below the armpit intersection of the sleeve and shirt. For the 6-9 month dress, I cut the shirt off about 3.5" below the sleeve/shirt intersection. You can experiment with different t-shirt and skirt lengths and figure out what works for you.
Step 14: Use pins to mark the center fronts and backs of the shirt and skirt.
Step 15: Turn the skirt inside out and pin the shirt and skirt together, matching the center fronts and backs, and matching the side seams of the shirt with the places where you started and stopped your gathering stitches.
Step 16: Gathering. Hold onto the two threads from the side of the skirt facing you. Pull the threads while at the same time using your other hand to gather the skirt fabric. Pull the threads until the gathered skirt edge is the same length as the section of shirt you will be sewing it to. Gather from one side seam to the center front or back, and then repeat this from each side seam, until your skirt is all gathered up.
Once the gathered edge is the right length, I take the two threads and wrap them around my pin a few times to keep the gathers from falling out. Next, evenly spread out your gathers and pin a few times in between your center and side seam pins.
Step 17: Sewing skirt and shirt together. Change your sewing machine needle to a new ballpoint needle. You don't want a woven needle to put holes in your t-shirt fabric after all the work you've done! I chose a stitch with some stretch in it, stitch "F" on my machine. I worry that if I used a straight stitch that the seam would pop too easily since the t-shirt is meant to be stretchy and the dress is put on over the head. You could use a narrow zigzag stitch, or even serge the skirt and shirt together.
Sew the seam in between your two rows of gathering stitches.
Step 18: Take a look at how cute the dress is. Look closely at the bodice/skirt seam and make sure there aren't any unwanted folds or tucks in the t-shirt fabric. If there are, unpick them and fix them before you go further. Once the seam is good, go ahead and pull out all your gathering stitches.
Step 19: Zigzag the edges of this seam.
Step 20: Hem the bottom of the dress by folding the raw edge under twice and stitching near the folded edge.
Step 21: Press the hem. You're done!
So, there you go. I hope everything is explained clearly enough here, please let me know if you have questions or need clarification on anything.
I would love to see pictures if you make a dress using this tutorial.
Also, if you modify this tutorial for a larger size, please let me know so I can either link to you or include your modifications here, if you prefer.
Subscribe to:
Posts (Atom)