

And here are the steps, with handy explanations:
1. Remove the left needle. (I left the cone on but the needle is out, for now.)
2. Remove the stitch finger. On my machine there is a lever to press in order to remove the stitch finger.
3. Adjust the dials on the side for rolled hem stitch width (really narrow) and length (really short). The dials have "R" markings for the rolled hem setting.
4. Adjust your thread tensions. This is the thing that I had a big a ha moment about. The rolled hem is going to be rolled down to the underside of your fabric.
You want the upper looper thread to be looser, so it can be pulled down slightly to the underside of this hem stitch. Smaller numbers=looser tension (this one took a while to sink in for me). So if I'm normally on about a 6 for the upper looper tension, I change it to a 4 or 5.
Now you want your lower looper thread to be tighter, so it will pull the upper looper thread down to the underside of the hem stitch. Adjust the dial to a higher number. I adjusted it up to between 7 and 8 from the normal 6.
Finally, your right needle tension needs to be loosened. And I didn't change mine very much. The handbook says to put it at 4 but I've had success with it a bit tighter.
Now you can try this out on a swatch before you actually start on the garment you're hemming. If it doesn't look right, adjust one thread tension at a time and see if you can get it. Hope this helps!
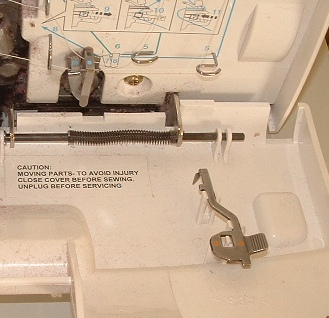
Oh yeah--I also took a photo of the correct stitch finger storage position since I can't ever remember the way it goes in:
23 comments:
Thank you ! After having my antique serger for 20 years, I finally needed to do a rolled hem on 24 yards of ruffles for a dance costume. The instruction book was nowhere to be found, and I was totally without a clue how to proceed. I found a throat plate without a stitch finger and a presser foot marked "R" in my accessory box. After installing them on the serger, I was able to use your instructions to produce a perfectly rolled hem on slippery polyester.
This was such a lifesaver! Thank you so much! I to lost my manual for the same serger and really wanted to do a rolled hem. Luckily I found your instructions, and produced one within minutes! Thanks so much!!! Oh and the pic of the stitch finger thingy, was so helpful, since I had no clue what is was till I scrolled down :)
Wow, thank you! I've been doing a lot of trial and error with my brand new machine, and these directions make it make a lot more sense. I'm about to do a couple projects with rolled hems, and am glad to have some good advice to start it out with!
Thanks for this post, it really helped me figure out how to create a rolled hem! I have the same serger as you, and I am still trying to figure it out. Any pointers are really appreciated!
Thank you VERY much for this! I have no idea where my book is and I have a brother as well! YOU ROCK! ps - i LOVE your leggo debris trough! FAB!
This is great! By the way my machine doesn't have any R's! I watched a youtube video that said to put in on the rolled hem setting, haha, my machine is older than that! I love the lego trap too, I just have a pile of junk that falls on the floor!
Who knows where to download XRumer 5.0 Palladium?
Help, please. All recommend this program to effectively advertise on the Internet, this is the best program!
Thanks for the info. I cannot find any info on how to begin and end a blind hem in a continuous fabric such as a sleeve or pants leg. Can anyone help? Thanks
Thank you for this tutorial. I needed it today to finish my daughters' ball gown and found you via google search. Your tute worked perfectly.
Thank you VERY much. I have my book and it doesn't tell me a thing really!
Have you ever had a problem when doing a rolled hem over seams? I'm finding my machine changes the tension and the rolled hem stitching gets wide and ugly over the seam. Any tips! I have the Brother 3034D which is basically the same as the 1034.
Anon--
you could try pounding your seams to flatten them out really well before you hem. I do this when I hem knits using my coverstitcher--I just use the narrow end of a wooden spoon and pound them on the countertop.
I found your directions when I, like many others, needed to make a rolled hem and have lost my manual!
Excedllennt instructions. Thankyou very much.
I took the liberty of looking at some of your finished 2010 projects. You have been very busy - I don't know how you completed all those projects while raising three beautiful children and doing all the other things required of a mother. Well Done! Now if only I could get ONE project done....
Thank you so much for this valuable tutorial! I'm just learning how to use my new overlocker and I've been practicing rolled hems on all sides of some fabric squares. I couldn't figure out why the squares would never lie flat after each side had been hemmed -- until I took your advice and adjusted the tension dials! Perfection! Thank you from Sydney, Australia! :-)
I am hoping you are still able to reply to comments on this post. Do you know if you are using a 3-thread overlock machine if you still need to remove the left needle? I am using a friend's machine, which doesn't have a manual (or even one available online). Hoping I can figure out how to create a rolled hem with it for a crib skirt I'm working on for our first baby girl (after three boys!). Thanks!
Bethany-- I'm pretty sure if it is a 3 thread machine there will only be one needle. So don't remove it. Let me know if this helps!
OMG, I just fell in love with my surger all over again! <3 thank you
Thank you for sharing you gave info. I couldn't get in the manual! Do you have any experience in using this machine for flatlocking? If so please share!
I have a 634D Brother Serger. My book tells me to change the needle plate and the foot and to also remove the right needle. These I managed to do. Then I am supposed to move the upper blade out of the way, this I managed also. Now it says to move the lower blade next to the plate, and I haven't been able to follow the instructions for this. Also I'm told to change the sewing pitch and to do this I have to open the material cover plate, can't figure out how to do this. Any help you give me will be greatly appreciated.
So glad you included the stitch finger placement pic.....felt really lame trying to insert it.
This is the thing that I had a big a ha moment about. The rolled hem is going to be rolled down to the underside of your fabric. maquinas de coser
Have had a serger for over 16 years and always struggled with it. Never really got the tension good until I took it in to be cleaned and someone else would do it for me. I have and order for 40 table runners, 400 chair covers and I don't know how many tablecloths to be finished by August. Thank you! Have read many tips Online but you are the only one who made sense to me. Thank you many times. You are the best!
You just made my year!! I own a bridal shop and strictly use my serger to do a rolled hem on the edge of veils. I had to purchase a new serger about 2 years ago after the one that had been here for years died. I've gotten so frustrated with the tensions that lately I've just been sending them to my mom who has all of the settings on her machine figured out. I've been sitting here looking at this new serger and getting upset about the fact I spent money on something that I can't even figure out how to use properly! I always knew it was a tension problem, but never knew which way was tighter/looser and how to determine which threads to tighten/loosen to get the right look on the extremely light weight fabric. Thank you a million times! Your explanations were simple and easy to follow!
Post a Comment