
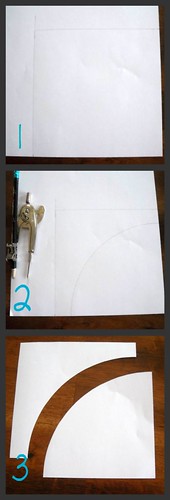
Image 1. I drew my 6" square on a piece of paper, using the corner of the paper for two of the sides of the square. Seam allowances will be added later--don't worry about them for now.
Image 2. Using a compass, draw the arc of the circle while holding the pointy part of the compass on the corner of the square. You might want to draw a few different blocks, making the quarter circle section different sizes, to see what you like. When I made the template for my quilt, I had my 10-year-old draw up a few different sample blocks and in the end decided on one where the quarter circle is kind of large in proportion to the square.
Image 3. Cut out both pieces.
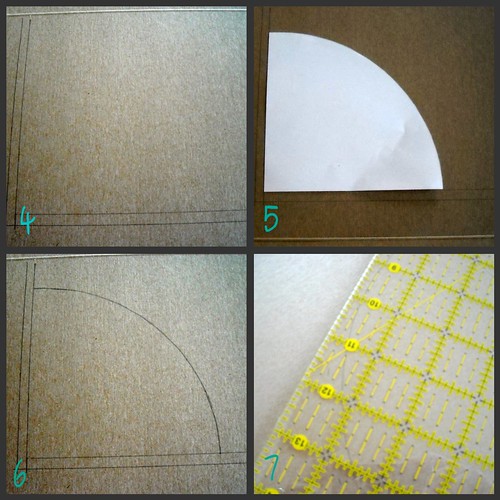
Images 5 and 6. Place the paper template on the cardboard next to the straight lines, and trace the curved edge. Or, you could use your compass, making sure it is adjusted to the same angle it was for the original paper template.
Image 7. Add seam allowance to the curve. I use my ruler to make a series of small marks that are 1/4" from the original line, and then draw a line to connect them. Rotate the ruler as you go around the curve to make sure the marks, and the seam allowance you are adding, will be an even 1/4" from the original line. (I hope that makes sense. If you have another way to add even seam allowances to curves, please share!)

Image 9. The template for the square corner part of the block. I used a ruler to draw all the straight lines, and traced the paper template edge for the curve. Then added the curve seam allowance using the same method I used for the quarter circle template.
Image 10. Cut out your finished templates!
Please let me know if you have any questions or if this is confusing at all!
The next post in this series will address figuring out your fabric yardage requirements, and cutting out the blocks. I'd love to hear from you if you are working on a quilt (or thinking about it) using these ideas!
1 comments:
Thank you for sharing. I'll do it!!
Post a Comment