Here's a tutorial showing how to make a cute little crooked pumpkin quilt block. There are a lot of pictures here but it isn't difficult. These instructions are for the pumpkin in the middle in the picture above.
Step 1: Cut an orange square, mine is 2 3/4" here.Cut two background squares (I used purple), 2". Cut the squares in half diagonally.

Step 2: Sew the background triangles on to each corner of the orange square. They don't need to be straight or matchy. Try to make sure these seams don't overlap each other or you might need to unpick a stitch or two when you open them up (like I did).

Step 3: Trim the corners that stick out past the orange square.

Step 4: Fold the corner pieces open and press.

Step 5: Flip the block over and trim off all the background pieces that stick out beyond the orange square.

Step 6: Trim off all the orange corners that are under the background pieces. This will reduce bulk in your finished pumpkin.

Step 7: Cut a wedge or rectangle for your pumpkin stem, about 1" x 3/4". Mine was a little taller than that and I trimmed it. Also cut a rectangle of background fabric about 1" by 3 1/2".

Step 8: Cut the rectangle for the stem background in half. If one side of your stem piece is angled, cut the background piece that will be sewn to the angled side, so it has a matching angle.

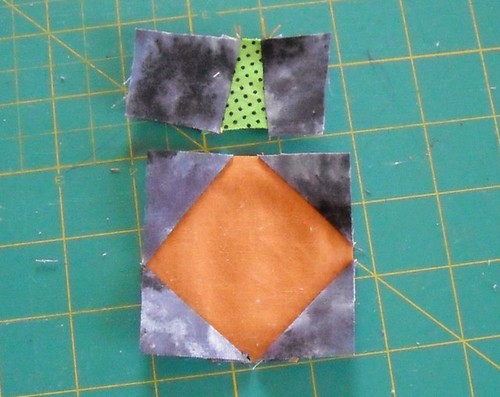
Step 9: Sew the background pieces onto the stem piece. Press.

Step 10: Trim the top and bottom edges of the stem section so they are parallel. If your stem section is a little longer than the pumpkin section, trim it to match. Or wait and trim it after they are sewn together.

Step 11: Sew the stem section to the orange pumpkin section. My stem is kind of weird here, oh well.

Finished view--here's what the pumpkin looks like when all sides were sewn into a little mini quilt. I can't show the whole thing quite yet, sorry. I like how it turned out!

You can change the measurements and make larger or smaller pumpkins, if you want.
I hope you like this, and I would love to see pictures if any of you make your own crooked pumpkin blocks! Please let me know if you find any mistakes or need clarification!

5 comments:
sweet! all the look of paper piecing, but none of the hassle!!
cute pumpkin. love it
Great tutorial! thanks!
Thank you for sharing! I love that this is a quick solution to an under decorated holiday home. Absolutely adorable. I'm sure my readers at AllFreeSewing would appreciate this project as well. Thanks again!
Just found this on your site. Not sure why I've never seen it before! Darling, Vicki.
Post a Comment